Pages

Unusual Ingredient of the Week - Biga Starter

For the non-bakers or people that haven’t read the Macrina Bakery and Cafe CookBook - which is highly recommended, though sadly lacking in pictures - a Biga Starter may be a new term (contrary to popular belief, Biga Starter is not a wannabe ‘gangsta’ rapper).
However, once you utilise the Biga in your baking, it will become part of your daily (or at least weekly) bread vocabulary.
The Biga is an Italian starter that only requires a minimum of twelve hours 'prooving' up to a maximum of 48 hours. During this time, the yeasts in the starter go forth and multiply, the gluten matures and the flavours develop.

After this period, it starts to go too sour and will spoil the flavour of the bread. It cultivates a light, loose texture and a slightly fermented scent. However, if you’re thinking that this is of a similar ilk to the over-rated minimalist loaf (and click here for the final word on it, from someone who knows his stuff), you would be wrong. This makes bread over 2-3 days so it is not a quick process. However, the results are worth the effort and if I can do it, so can anyone!
Unlike Sourdough Starters, the Biga does not require daily nurturing and for someone like myself who even managed to kill off a tank of Sea Monkeys, this is a real bonus. If you think of the Biga as an additional ingredient to your bread rather than another time-consuming process, then you will have no trouble at all. In fact, to make a Biga Starter is dead easy. 2 ½ Cups Plain Flour, 2 Teaspoons Dried Yeast and some warm water mixed together. I made mine in my lunch-hour.
Once you have made your Biga, you can then keep it in the fridge for 2 days. Each starter batch makes about 2-3 loaves (I made an Olivetta loaf and two Ciabattas) and lends its fermented flavour to Italian-style bread.
This was my first experimentation with bread making, Paul being the baker of the family, but I thought I would give this unusual method a try and it was completely successful (failing to mention that I had placed my uncooked Ciabatta loaves on greaseproof paper to prove without flouring them first and they stuck like nobodys business. Still, if I make the mistakes first, hopefully you won’t!).
The Olivetta Loaf I made last Thursday as part of a ca
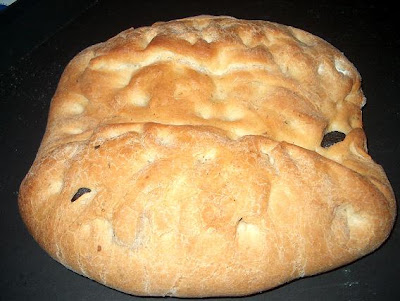
ke swap that Kathryn and I had agreed on. Typical me, but I decided not to make a cake but bread but there is a good reason: I didn’t have any butter. That is a good reason, right?
The Starter had had about 12-15 hours resting time in the fridge. It rises to the top of the bowl magnificently but when you scoop it out onto the scales, it deflates to not much more than a sticky handful.
The Biga is then mixed up with some warm water and more dried yeast (usually about half a teaspoon), then the bulk ingredients (i.e. flour and olive oil) are worked in. It does help to have a hands free mixer. I didn’t have one but I used my electric hand whisk, which, whilst still arm achey, was not as bad as starting the dough off by hand. At this point the dough can be turned out onto a floured surface and then kneaded by hand for 10 to 15 minutes. I had previously disliked the idea of making bread because of this stage of kneading but I actually found it to be really rather therapeutic. A good way to rid yourself of any rage or discontent against work colleagues without actually causing anyone any physical harm.
The Ciabatta is even easier although requires a much longer rising time. There is an initial 10 minute kneading period which you will need to do with a hands free mixer or electric mixer because the mixture is very wet. After this though, you have 3 rising times of 1.5 hours each, doing a bakers turn of the loaf after each rising time. Then you have to leave the thrice risen mixture in the fridge for another 12 hours (or, in my case, 48 hours!) for the yeasty fermented taste to develop. The result though is an authentic tasting Ciabatta that is rich in flavour and full of the air bubbles that is so traditional of this classic Italian loaf. You can then toast the bread and serve it as Bruschetta or just spread it with butter and have it with soup.
Once you have your Biga starter, you can experiment with various textures and flavours of loaves, different herbs, sun-dried tomatoes, seeds, semolina, nuts.
I have listed a recipe for the Seed Biga Starter which is a more robust starter that allows a deeper flavour and texture in your loaf.
SEED BIGA STARTER taken from Macrina Bakery and Cafe Cookbook
(makes 2 1/4 pounds of starter)
Ingredients
2 Cups Filtered Water at room temperature
2 Teaspoons Dried Yeast (one small sachet of Yeast)
4.5 cups Plain Flour
METHOD
Pour the water into a medium sized bowl and sprinkle the yeast over the top. Leave for 5 minutes. Then stir in 2 CUPS of flour (I used all 4.5 cups at first and had to bin the first lot) until fully amalgamated and leave to stand at room temperature, uncovered, for 2 hours.
Preferably using a hands free mixer, add the rest of the flour and mix well for 7 minutes using the dough hook. The dough will be sticky and a bit stretchy but not resemble true bread dough.
Transfer the starter to a lightly oiled bowl, cover and let stand for another 2 hours.
Finally, store in the fridge for at least 12 hours, no longer than 48 hours.
You can now use your starter to make a variety of Italian styled breads! (For fear of writing too long an article, I won't list the bread recipes here, but if anyone is interested, email me at the address on my profile page, and I will happily send you the recipes!)
reade more... Résuméabuiyad

A Heart Shaped Meme

Valentines Day. The second most money spinning ‘special day’ of the year, following Christmas.
No sooner are the red and green decorations that signal Christmas taken down, than the red ones are hawked back out again, cut into heart shapes and displayed gaudily in shop windows.
I think that my own animosity towards Valentines Day stems from the fact that I have never received a Valentines card or gift in all my life (and I’m not counting the pity gifts from my mum). Obviously, as a moony teenager, all you want is some pink and red (and perhaps glittery) card from an anonymous beau. Flowers would be better still and chocolates best of all, particularly if they are heart shaped and caramel stuffed.
But no. No anonymous gifts were ever forthcoming. So, to spite the fat, pink symbol of Valentines Day, Cupid, I walk past his tokens of love and spend the money on food or cookbooks instead of overpriced teddy bears clutching pink hearts to their chests.
Paul and I don’t need to celebrate Valentines Day anyway: our anniversary is exactly 7 days before (not sure if Paul planned it that way, but some wives would insist on two lots of gifts!) and that is much more special occasion to celebrate.
Still, in spite of all my vitriol aimed towards Cupid and his money-spinning scam, I am a sucker for a food event (which you may have noticed by now) and, providing it doesn’t involve icing cakes in an artistic manner or doing anything in an artistic manner for that matter, I’m hot to trot. This particular food event, as I mentioned yesterday, is being held by Meeta over at Whats for Lunch Honey and no prizes for guessing what the theme is (as if this overly long and convoluted post didn’t give you some clue).
Plus, I have been asked by Andrew to review a relatively new British food magazine, called Country Kitchen, for his slot over at Paper Palate on the Well Fed Network and seeing as the theme for this month was Valentines Day, I thought I’d kill and stuff two proverbial birds with one poorly aimed stone.
So, I had planned on making a saucy dessert, made scarlet with raspberries and strawberries, perhaps something with cream or jelly, or a tart curd of some sort. Perhaps a simple Creme au Coeur. However, my desire for something savoury got in the way of all so I made a distinctly unpudding-like main course: Cherry Tomato, Goats Cheese and Onion Marmalade Tart.
The original recipe, entitled Love Apple Tart, had a slightly more Mediterranean feel than my taste buds were dictating yesterday, using anchovies and olives but I wanted something more bolstering. I wanted onions and I wanted Goats cheese!

What this picture doesn't show is our 'arts and crafts' (read botched) heart shaped mould, professionally fashioned by Paul from a cornflake box and some tinfoil. What this picture also fails to indicate is the collapsing of the tart whence it was moved from the pizza stone and onto a plate. Still, this teaches us two things: 1) use proper bakeware and 2) use round tart tins. Frankly though, it tasted delicious and if it's just for the two of you, then who cares if you're eating the tomatoes with your fingers and breaking bits of pastry off becauseyou can't wait for it to cool off?

CHERRY TOMATO, GOATS CHEESE AND ONION MARMALADE TART serves 2
Ingredients:
Shortcrust Pastry
500g Cherry Tomatoes, small vine ones have the most flavour
100g Goats Cheese, any kind, soft and crumbly or sliceable
2 Large onions, peeled and sliced
Salt and Pepper
Teaspoon Brown Sugar
Drizzle Olive Oil
20g Butter
METHOD:
Preheat the oven to 180c.
Melt the butter in a frying pan and add the onions, some salt, lots of pepper and the sugar. Let them sweat down over a low heat for half an hour or until collapsed, golden and a bit like marmalade. Leave to cool.
Whatever shape tin you choose to punish yourself with, you will need to line it with your shortcrust pastry which is then to be blind baked for about 15 minutes.
Remove the pastry crust from the oven and spread the onion mixture over the base. Crumble the Goats Cheese over the top of this then top with the cherry tomatoes. Grind over some more black pepper, a pinch of salt and a little olive oil (not too much because the Goats Cheese gives off a lot of oil).
Bake for 30 minutes or until the tomatoes start to pop but not collapse.
Leave to cool for about 5 minutes before attempting to unmould but I'll tell you here and now, you'll have issues so it's best just to serve it in the tin
Enjoy!

Until I started food blogging, I had never heard of a Meme. I thought perhaps it was something to do with Mimes, but I wasn’t sure. Then I saw people who had been Meme’d and I longed for the day when, just as a fairy princess awaits her prince, my Meme arrived. Paul tells me that he was talking about memetics back in the heady 90s but then, he is always on the precipice of the zeitgeist.
Eventually, and with only a small hint to Jeff at C for Cooking (i.e. “you can meme me if you want”), here it is! My First Meme, entitled Five Things You Never Knew About Me (because you were too afraid to ask).
1) Paul and I used to be punks and that is indeed how we met, through a punk forum board and not, contrary to popular belief, through an online dating agency. What this means is that you can ask me or Paul about most any punk music and we can give you a brief (or longwinded) rundown of their history because we’re both punk anoraks. I also once held email conversations with Richard Hell and Arthur Kane from the New York Dolls, plus I interviewed Penelope Houston from the Avengers and Jennifer Miro from The Nuns. I would most like to converse with Morrissey.
I suppose this could constitute two things that you didn’t know about us already but I’ll be fair and let that one slide.
2) I have never tried duck although I bought some at the weekend to cook. Also, I would never eat Fois Gras. I would, however, give Fugu a try, reckless thing that I am.
3) I wish that Anthony Bourdain was my Dad.
4) I have written an article about Charles Manson movies published sometime this year in the Exploitation Journal. This ties in nicely with my love of horror films and grindhouse movies.
5) I used to think that Roughage was pronounced Roo-Ha. I have no idea why other than a juvenile confusion over silent ‘gh’.

I hope that this explains a lot. Perhaps it raises more questions than it answers. Either way, it's good.

reade more... Résuméabuiyad

Blogging Postcards!

The food blogging community are a sociable lot. It is always bolstering to find that someone has left an encouraging message for you, regardless of whether your dish really, really sucked or was restaurant standard.
Whilst we all write for ourselves, we wouldn't be posting our foodie ramblings online if we didn't hope that other people read them, and more importantly, enjoyed them.
But it's also good to have some real time communication with other bloggers, and whilst this isn't always possible (food bloggers inhabiting all four corners of the world and probably some planets that haven't been discovered yet), we can take part in food swaps, or this, Meeta at Whats for Lunch Honeys fabulous conception:
BLOGGER POSTCARDS AROUND THE WORLD #2!!
The idea is that we send a postcard to a fellow foodie somewhere in the world (as arranged skillfully by Meeta) and then we receive one back! The excitement is not knowing who will be sending the card, or where it will be coming from!
So, for my receivee, this is my postcard. It is not handmade because I have zero skill when it comes to artistic endeavours. However, I do have a long-time love of pulp fiction and this was such a cute postcard how could I not send it?
Meeta is also organising a Monthly Mingle for Valentines (how organised is she?) which I will be contributing to tonight...all will become clear in a few hours time!
reade more... Résuméabuiyad

Soup!

Ah, soup. The great nourisher. It's what I always turn to when I'm cooking for just me.
I'm not sure if I enjoy the ritual tearing of the bread most, or slathering it with unsalted butter that hasn't been out of the fridge long enough. Perhaps it's the dunking of buttery bread into the scaldingly hot soup, watching the butter pool, meltingly into the soup.
But it can be a thick, bolstering soup, like Jerusalem Artichoke or Gumbo that you swig from a soup mug or a thin broth that makes you feel like a recovering convalescent and that you sip daintily from a teaspoon like some kind of Jane Austen heroine.
Soup can be made by anyone with any kind of fridge situation. The soup that I am writing about today was made with very little in the by now cliched store cupboard.
I had no onions left. No onions in the house is a very poor state of affairs and a state that no one should ever be in. Thank goodness I had a couple of rapidly shrivelling leeks left. There was no carrots, no peppers, just a bunch of celery. So, with the celery and leeks in mind, I flipped through Jane Grigson's Vegetable Book. Straight away I am enticed by the Celery and Blue Cheese Soup recipe although I could have gone for Celery and Dill too.
This is my entry for the coming Weekend Herb Blogging being held by Ed at Tomato. And I promise, this is my last blogging event for a while (except for a Valentines one coming up soon, but when else am I going to use heart shaped cutters and sprinkles?).

I modified the recipe to suit my distinct lack of onions and produced a nutritious, wholesome and delicious Celery, Leek and Blue Cheese Soup.

I feel sorry for the celery plant because it seems to have so many people that want to bully it. It's not the fault of this graceful, pale green plant that it's a bit stringy. That's what vegetables peelers are for! And besides, once you cook celery, it loses that strong, nutty, herbal flavour and becomes tender hearted, delicate and as generous of flavour as you could wish from any vegetable. It makes stews sublime and I feel lost without celery in the fridge.

An amusing anecdote that occured during the making of this soup: I wanted to use up some of my chicken stock that I always have bags of in the freezer. However, due to the colour of the stock, it also resembles stewed apples and frozen egg whites. With this in mind, you would think that I labelled the bags up, but no. I'm lucky if I can find my left hand in the kitchen sometimes, let alone a pen.
Anyway, I eventually find a bag of what looks like it might be chicken stock (although it looks more like frozen custard) and I plunge this frozen iceberg of yellowy mystery liquid into a pan of water and set about thawing it. So, I'm chopping the celery and the leek when I glance over at the pan with the 'stock' in it and see that there is a strange smell emanating from it, and the water seems to be incredibly cloudy and a bit starchy. Closer examination revealed that what I had thought was stock, was in fact leftover mashed potato from our Turkey Meal. Crap.
So, for this particular recipe, I would recommend using Chicken Stock Cubes....as I had to.

CELERY, LEEK AND BLUE CHEESE SOUP serves 4
Ingredients:
1 Head of Celery, roughly chopped into small pieces
2 Leeks, stripped of its coarse outer leaves and cut into rings
30g Butter
Salt and Pepper
30g Flour
1.5 Litres Hot Chicken Stock (made from cubes or fresh, but not mashed potato)
40g Blue Cheese (to taste)
METHOD
Melt the butter in a large saute pan and throw in the chopped celery and leek, making sure to coat them throughly in the butter.
Turn the heat down to low and put the lid on. Leave to sweat down for at least 20 minutes.
Add the flour and stir until has absorbed all the butter and coated the vegetables. This will thicken the soup.
Pour over the hot stock and stir well to disperse any lumps.
Season.
Simmer gently for another 30 minutes or until the vegetables are tender and yield under a spoon.
Remove from the heat and crumble the blue cheese into the soup, stirring well to ensure that it melts.
Serve in bowls sprinkled with a bit more cheese and some chopped parsley (optional) and, of course, some bread and butter.

reade more... Résuméabuiyad

Cupcakes!

It's very early in the morning. I'm bleary eyed and hungry. My tooth aches. Too much sugar on my cereal. I watched some Fox News (which satisfies my need for sensationalist, crime based stories) and then watched the snow falling outside.
I have to go and defrost my car soon. For now though, let us forget the cold weather and the toothaches and escalating crime and gaze instead upon my entry for the Cupcake Roundup being held by Cheryl at the Cupcake Bakeshop and Garrett at Vanilla Garlic.
My attention was drawn to this round-up by two mouthwatering entries: Brilynns over at Jumbo Empanadas with her Carrot Cupcakes AND Banana Cupcakes. She really does care that we get our vitamins. And then there's the Gemma at Dressing for Dinner with her awesome Double Seville Orange Cupcakes (although she must have made a pact with the devil to have gotten ahold of some Seville Oranges because 'round these parts, they're as rare as a blemish free McDonalds worker).
I had actually decided not to submit an entry to this event because I've never made cupcakes. Sure, I've made muffins but they're like the brains of the small cake family: you have the baby of the family, the petits four, then the beauty of the family, the cupcake with all it's a glossy, painted glory, then the artist of the family, the ethereal fairy cake and finally the oldest child who went to college and got a good job, the reliable muffin.
Ok, so it might not be a great analogy but the point is, I'm not artistic. I can dollop mixture into the cases but when it comes to pretty-fying them, I'm at a loss. It's not that I don't appreciate art, quite the opposite. I studied History of Art at school and understand many of the themes behind Salvador Dali's surrealist masterpieces, however, ask me replicate them (or indeed even a 'simple' Joan Miro) and let the ridicule begin.
With that disclaimer in mind, here is my entry, which I decided to make after spending a night alone whilst Paul was at a course (the devil will find work for idle hands and Morrissey fans to do...), prowling the kitchen finding things to do. Not only did I make a starter for Italian bread, I also made a delicious soup (see my forthcoming post for Weekend Herb Blogging) and these minty little morsels: Grasshopper Cupcakes.
Yes, inspired by the 50s diner Grasshopper pie (see my miserable failure at replicating this dish) and its predecessor, the cocktail, I decided to expunge on the theme of mint and chocolate. The cake itself is a simple butter, flour, sugar mixture with Green and Blacks cocoa powder and a dash of Peppermint Extract. Nothing too exciting there, I here you cry. Aha, but look at the picture below and marvel in the cross section of the cupcake displayed..what's that? A York Mint Bite? Hell yeah! (For English readers, my Brother-in-Law, Mark bought these over from America for me but our upper-class equivalent, Bendicks, would work). Top this with a mint green icing (not as green as I had hoped but I didn't have any green colouring), made mouthwash minty with my own special mint sugar syrup, using the fresh plant, hence the speckled effect.
I was pleased to taste a cupcake without the icing and found its tender, chocolatey sponge to be really quite delicious, the faint hint of peppermint not too strong. In fact, I think I prefer them without the icing but then, I'm a bit peculiar like that.
Here then, is the recipe for my Grasshopper Cupcakes.
GRASSHOPPER CUPCAKES makes 18 regular size cupcakes
Ingredients:
225g Plain Flour, sifted
4 Tablespoons Cocoa Powder
1 Tsp Baking Powder
225g Caster Sugar
Pinch Salt
225g Unsalted Butter
4 Eggs
1 tsp Peppermint Essence
18 Chocolate Covered Mints (like York Peppermint Bites or Bendicks)
For the Icing:
115g Softened Butter
225g Icing Sugar
1 tsp Peppermint Essence or Mint Syrup (made with 100g sugar boiled up with 100ml water, add a bunch of chopped mint, boil for 30 seconds then remove from the heat and puree)
Green Food Colouring (optional if using the Mint Syrup as this is already green)

METHOD:
Preheat the Oven to 160c (325f).
Line 2 Cupcake Tins with 18 Liners.
In a bowl, sift together the flour, cocoa powder, baking powder and salt.
In another bowl, cream together the butter and sugar until smooth.
Beat the eggs, one at a time, into the butter and sugar.
Gradually mix in the sifted flour and cocoa powder, mixing to a smooth thick consistency.
Finally, stir in the teaspoon of Peppermint Essence.
Put a teaspoon of the mixture into each case, then a chocolate/mint then top with another half teaspoon or so of the mixture (however much it takes to use up all the mixture).
Bake for 20 minutes or until slightly risen and springy to the touch.
Leave to stand for 5 minutes, then remove from the tin and leave to cool.
Meanwhile, mix up the butter and icing sugar until smooth. Stir in the peppermint extract (or syrup) and colouring.
Once the cupcakes are cool, spread a thick layer of the icing over each.
You could probably also palm these off as St Patricks Day cupcakes if you stuck a green marzipan Shamrock on top of the icing.
reade more... Résuméabuiyad

Saving the Planet One Meal at a Time


Humanity has placed a lot of emphasis on the environment over the last few decades. There are those who believe that global climate change will be the end of all life on Earth and that humans and our technology are entirely to blame for this. Others would have us believe that these changes are part of a natural cycle and that the Earth can sort itself out without our help. There is some truth in each of these arguments, but each side engages in plenty of deception as well. Maybe deception is a bit harsh, but there is at the very least some misdirection.

Anyone with even a limited education in astrophysics knows that the destruction of our planet and indeed the entire universe is assured. There is no avoiding the inevitable. This is probably (hopefully) not right around the corner, but all life on Earth will eventually cease to exist.

On the other hand, there’s no reason why we should artificially encourage this effect. There are measures that we can all take to limit our impact on the environment. These measures are not the usual suspects. Despite the attempts of government agencies, international committees, and environmental groups pollution continues virtually unabated. One of the biggest culprits is the faith in this panacea known as recycling.

In contrast to the Industrial Revolution, recycling is a relatively new concept. This is because previously recycling was unnecessary. The invention of polymers and mass production of metallic compounds as well as increased dependence on paper pulp has brought about this modern phenomenon. Various governments would have us believe that recycling is the answer to all our problems, but I stand in defiance. When I see recycling bags in front of my neighbours houses the first thing I notice is the abundance of food packages and tins. I see unrestrained consumption and lazy consumerism. I see a culture that has forgotten how to cook from simple ingredients and exchanged quality for convenience.

The only way to slow down the process of destruction for which we are all inexorably destined is to reduce our use of resources. This isn’t anything to be afraid of because there are some really simple ways to achieve this goal without experiencing too much discomfort. Four important measures: buy locally, buy sensibly, use almost everything, and compost.

Buying from local producers not only supports a local economy, but also reduces reliance on supermarket chains. This has the knock-on effect of reducing fuel used for shipping products as well as the additional environmental impact of displaying and cooling food on supermarket shelves. As an added bonus, you get fresher food from sources you know.

Sensible buying is easy. Don’t buy food you’re not going to eat. Don’t buy food which weighs less than the packaging it comes in. Buy ingredients rather than prepared foods. If you follow these rules, you’ll generate less waste. Obviously you won’t be producing as much packaging waste, but by cooking from scratch you have greater control over portion sizes meaning you won’t be throwing food out.

Using almost everything speaks for itself. There was a time when this was the norm. This was the result of necessity. It would have been foolish to throw out half the meat from a chicken in times of famine, but it’s just as foolish in times of prosperity. Extra meat and vegetables can easily be made into soups, casseroles… We strip all the meat off a chicken and make soups, gristle and cartilage make a healthy snack for the dogs, and the carcass is used for stock.

Finally, compost scraps. Most of the waste we produce ends up in the compost bin. Carrot peels, egg shells, coffee grounds, teabags, and potato peels are probably fifty percent of the waste we generate and it all gets composted.

In the spirit of this post and because ultimately this is a food blog, I want to tell you about a local source of free range eggs we’ve recently found. It was just a fluke, but one day while taking a shortcut between Earls Colne and Sudbury we drove past a farm near Colne Engaine. There was a table out front with eggs and a container for change. We bought a dozen eggs and then drove very slowly past the outdoor pens where a lot of very happy chickens were wandering around pecking at the ground and looking extremely content. We made pasta with these eggs and then we were hooked! We now make the five minute trip there every weekend. A little way up the road from there we’ve bought black walnuts and tomatillos, of all things, from another similar little farm.

So, instead of putting out a recycling bag full of Heinz Weight Watchers Chicken Tikka boxes and looking smug because you’ve eased your conscience, eat smarter and look smug because you’re actually making a difference.

The Recipes:
We have a tradition in our house. Every couple of weeks, usually on a Saturday during the Dr. Who omnibus, I go through the fridge and find any vegetables that are nearing the end of their usability. I chop them up and throw them in a pan along with a bit of chorizo and then add a couple of my favourite ever eggs. I mix it all up, add some cheese, and serve it up on flour tortillas. There is no recipe because it’s always different. They’re not always great, but they’re always good and it’s one less trip to the compost bin for me. (And there’s no picture because it’s not very attractive.)

The second recipe is in the same spirit because it uses elderly vegetables, but it’s a bit more structured because it’s based on one of my favourite childhood foods. The key ingredient is Kielbasa and fortunately a polish friend named Peter went home for Christmas bringing me back some great Kielbasa.

Sausage with Root Vegetables
Ingredients:
250g Kielbasa or Kabanos
3 large potatoes cubed
4 carrots sliced thickly
4 celery stalks sliced thickly
1 onion cut into eight chunks
1 stalk of spring greens or similar chopped
30g butter
salt and pepper
2 Tbsp water

METHOD
Melt half the butter in a pan, add Sausage and fry over medium heat for about five minutes. Add all remaining ingredients except butter and stir briefly. Cover and simmer on low heat for 40 minutes. Remove the lid and add remaining butter. Let melt over vegetables and reduce any remaining water over high heat. Taste for seasoning. Serve.

P.S. If you’re reading this and you’re from the farm in question, please leave a comment with proper directions to your location.
reade more... Résuméabuiyad

One Pot of Ricotta - Two Meals

It seems to me that the short time at the beginning of the month when we have spare cash is over within 24 hours, a bit like the summer equinox. A fleeting, beautiful time where frivolity and reckless spending is encouraged. And then it’s back to paying with cheques and eating dried pulses and pasta.
Yes, that's right. It’s another end of the month post. Fortunately, due to some judicial food shopping during the aforementioned vulgar display of cash spending, we have enough food in the freezers to see us through the next 8 days (and next vulgar display of....)
Sometimes though, it’s not just the end of the month that makes me more inventive than usual. Sometimes I forget to take that evenings meat out of the freezer. And when you want dinner in a hurry, nothing takes longer to defrost than a concrete hard block of meat. Last night we were supposed to have chicken. I forgot to remove the chicken from its chilly lair at lunchtime. We don’t have a microwave. We had pasta with peas instead. If anyone knows how to defrost meat without the aid of modern technology, please tell me!
Actually, I had been craving pancakes AND pasta, so this was as good excuse as any to make them and I certainly cannot wait until Pancake Day which is sometime in February.
I managed to utilise some leftover ingredient: an opened pot of Ricotta Cheese (250g) with a teaspoon taken out of it (don’t ask me the reasoning behind that), some blueberries that were starting to resemble raisins plus a couple of rashers of bacon. Throw in a few store cupboard essentials (frozen peas, free range eggs, flour, milk, pasta and Parmesan cheese) and there in front of me was the bare bones of a substantial two-course (though slightly unorthodox) meal that also qualifies this as an entry for Leftover Tuesday. David at Cooking Chat is hosting a new blogging event (which seems to be my new addiction, having taken part in about 10 this week already!) called Leftover Tuesday. The aim of the game is to utilise one sad, shrivelled item leftover in your fridge/cupboard/under the sofa and turn it into something wonderful. Here then is my attempt:
Course 1, not really a starter nor a dessert but remember I was craving pancakes, hence Ricotta and Blueberry Pancakes with Blueberry Compote.
This should be a no-brainer of a dish. It is a simple ‘stir and drop in hot fat’ meal, but somehow in my frantic rush to make myself pancakes, I screwed up, although not to the detriment of the dish. I was working with two bowls, one with the separated egg whites in it waiting to be whisked, the other with the rest of the ingredients. However, instead of putting the ricotta in with the egg yolks and flour, I accidentally poured it into the egg whites. I quickly scooped out the now egg-white coated ricotta and placed it into the correct bowl. My egg whites were now looking like they might not whisk as well as they should, but, as every cook who makes a blunder hopes, I thought that perhaps I’d stumbled across some new culinary trick. That somehow a scientific miracle would take place between the whites and the ricotta and produce the lightest, fluffiest pancakes ever. Obviously my naive dreams were shattered promptly: the whites barely got up a froth much less the billowy clouds I had hoped. Not to worry though, once the whole lot was combined and cooked, the pancakes were actually really very delicious. The compote was painfully easy to do (although I even managed to make the sugar clump up because I had the heat too high) and was perfect with the fluffy pancakes. I think Paul enjoyed them because this is pancake as he knows it; not our frilly, wafer thin crepes but thick, fluffy ones.

RICOTTA PANCAKES WITH BLUEBERRIES serves 2 generously (about 8 pancakes, 4” dia.)
Ingredients:
150g Ricotta Cheese
2 Eggs Separated
Pinch Salt
90ml Milk
100g Plain Flour
½ Teaspoon Baking Soda
150g Blueberries (100g for the Compote and 50g for the pancakes)
90g Caster Sugar
20g Butter
Some butter for cooking the pancakes.
METHOD:
In a large bowl, mix together the ricotta, egg yolks and milk until it is lump free.
Sift in the flour, baking soda and salt.
In another bowl, whisk the egg whites until gently peaking.
Fold into the ricotta/flour mixture.
Gently fold in 50g of Blueberries.
Leave the batter to rest whilst you make the Compote.
In a small saucepan, gently heat together the remaining blueberries, butter and sugar until a smooth syrupy sauce forms and the blueberries just start to pop. Remove from the heat.
In a large frying pan, heat 20g butter. Drop in tablespoons of the batter. Once bubbles start to appear on the surface, flip them over gently and cook for a minute or so more on the other side.
Serve them stacked high and drenched with the compote.

Course 2: Farfalle with Peas, Bacon and Ricotta. This is a quick pasta dish that I make in times of extreme bareness of the cupboards, usually replacing the ricotta with milk and more cheese. It is tasty, simple and nutritious and uses up the remaining 100g of Ricotta Cheese.
FARFALLE WITH PEAS, BACON AND RICOTTA serves 2
Ingredients:
200g Farfalle Pasta (bow tie)
100g Frozen Peas
100g Ricotta Cheese
1 Onion, thinly sliced
2 Rashers bacon or pancetta, cut into lardons
Grating Parmesan
Small Handful Fresh Parsley
Olive Oil
Salt and Pepper

METHOD:

Cook the pasta as per the instructions on the packet, until al dente. Drain, reserving a cup or so of the cooking liquor.
Whilst the pasta is cooking, heat the olive oil in a frying pan and fry the bacon until golden brown and the fat rendered.
Turn the heat down and add the onion, gently sauteing until meltingly soft.
Add the frozen peas, coating well in the onion/bacon mixture, then pour over the cup of reserved pasta liquor. This will help to form a sauce.
Bring to a gentle simmer.
Stir in the ricotta and season.
Remove from the heat, grate over some Parmesan to taste, sprinkle over the parsley and serve.
Enjoy!

And in another vulgar act of self aggrandisement, I am proud to point any regular readers to feedback left on this old post of mine:
http://zombiesnack.blogspot.com/2006/11/interesting-supper.html
reade more... Résuméabuiyad

The Quesadilla Purist is Corrupted by the Pastry Queen

Yes, another Pastry Queen dish, further experimentation for next Saturdays Tex-Mex Fiesta. Curiously, only two of the recipes I’ve ever cooked from this book actually use pastry. Perhaps I’ll make the Bourbon Apple Pie next weekend to level the field a bit.
Back to the meal in question: Brisket and Brie Quesadillas. I am a Quesadilla purist. I like them with cheese and nothing else. This could be down to a bad experience at a restaurant in Door County where I ordered a roast chicken Quesadilla and was served something that resembled an oil slick on a plate. Full marks go to the chef for trying to obscure this greasy mess with copious amounts of grated carrot and other vegetables that should never see the inside of a salad bowl, much less garnish a Mexican dish. However, I cannot forgive a restaurant that doesn’t serve salsa with a Quesadilla and the nearest thing that they have to sour cream is “mayonnaise or tartare sauce, ma’am?”
I am a generous person by nature though and I thought I’d at least try it. After removing much of the oil from my plate with several paper napkins and a high suction industrial vacuum cleaner, I gingerly nibbled a corner and was greeted with a yummy mouthful of....gristle and bone fragments. Yum! My favourite!
I delicately pushed the plate to the side and picked at my husbands fries. He, who was sensible enough to order the quarter-pounder, gallantly offered me half of his lunch but I couldn’t take food from him. Besides, I was feeling much too nauseous after that unpleasant mouthful. Paul tasted the Quesadilla and noted sinisterly that he had “tasted worse.”
That experience was over five years ago now (five years!) and since then I have only partaken in ‘virgin’ Quesadillas. That is until yesterday. It took the Pastry Queen to change my mind but there I was, yesterday afternoon, cooking a big hunk of beef in Coca Cola, with every intention of stuffing flour tortillas with it.
You heard right, Coca Cola.
Well, it’s not so unusual. People have been cooking ham in Coke for many years so why not beef? It gives the outside of the meat a rich, caramel colour, slightly sweet but not overtly so. The inside is tender. Those damn bubbles, they work their magic so effectively!
So, whilst the beef (I actually used silverside and not brisket but I won't change the title because I enjoy the alliteration) was stewing in its Coca Cola bath, I made the barbeque sauce that Rebecca Rather suggests you serve with the beef.
I'm not generally a fan of Barbeque sauce, finding it much too smoky tasting but this recipe, which utilised ketchup, mustard, worcestershire sauce, fresh onion and garlic and mango chutney was quite revelatory. It was tangy, sweet and moreish.
Once the beef and sauce are prepared, you're good to go. Slap a flour tortilla in a hot frying pan (or on a griddle if your kitchen is super hi-tec), shred the beef with your fingers on top of the tortilla (or serve in manly hunks if you prefer), then dot chunks of Brie on top of that, grate some cheddar on top of that, finishing with a layer of the barbeque sauce, another tortilla and cook for about five minutes, turning part way through once the bottom has started to toast.
We served our Quesadillas with Sour Cream and some Pico de Gallo that Paul made (a very simple, fresh tasting salsa comprising of chopped onion, chopped tomato, chopped chilli and chopped coriander. Yes, that's a lot of chopping).
And what was our conclusion? We loved the beef. It was tender, slightly sweet and more went in our mouths than in the Quesadillas. Paul wants to replicate the beef and put it in Tamales.
The Brie and the Barbeque Sauce I probably could have done without. The Brie, tangy as it is, was engulfed by the sauce and the other cheese, so seemed a slight case of overkill. The sauce itself was good but I would be tempted to serve the Quesadilla with just the beef, cheese and some spring onions, then the salsa on the side. But then, as I said, I'm a purist.
BEEF AND BRIE QUESADILLAS serves 2, with enough for sandwiches the next day.
Ingredients:
1lb Piece of Silverside or Brisket
1 Can Coca Cola (DO NOT USE DIET!) but any generic brand will do
1 Teaspoon Chilli Powder
2 Cloves Garlic, roughly chopped
1 Teaspoon Salt and Pepper
Flour Tortillas (4)
Wedge of Brie (optional)
Some Cheddar or, more traditionally, Monteray Jack, for grating
Barbeque Sauce (optional. I haven't replicated the recipe here, email me if you would like it or refer the Pastry Queen book)
Pico De Gallo
Sour Cream
METHOD:
Preheat oven to 170c.
Mix together the Chilli Powder, Salt, Pepper and Garlic and rub all over the piece of beef.
Place beef in a baking dish and pour over the Coke.
Cover with foil and roast for at least 2 hours.
Once the beef is tender, trim off any excess fat.
Cut the beef into thin slices or shred.
Heat a large frying pan or griddle and lay a flour tortilla in the pan.
Layer up with the beef, cheeses and Barbeque Sauce if using. Place another tortilla on top and cook for a couple more minutes or until the bottom is toasted.
Carefully flip over the Quesadilla and cook for a few minutes more.
Cut into wedges and serve with the Sour Cream and Pico De Gallo.

PICO DE GALLO (THE ROOSTERS BEAK)
Ingredients:
20 plum tomatoes or 4 large tomatoes diced
1 medium onion diced
2 chillies diced very finely
large bunch coriander chopped coarsely
pinch of salt
1 Tbsp water or lime juice

METHOD
Mix all ingredients and let stand for at least ten minutes.
reade more... Résuméabuiyad

A Summery Supper


Or, to put it another way, my favourite picture so far. This is my entry for Weekend Herb Blogging, yet another first time event for me...this month it is being hosted by Scott at Real Epicurean. Thanks Scott!
There are certain cookbooks that you find yourself addicted to. You carry them around in your bag in case you get a spare few minutes to read it at work, all other cookbooks become forelorn because this particular one is getting preferential treatment. And then along comes another cookbook to usurp the last favourite and so the cycle continues and so our menu (and waistbands) expand further still.
My favourite cookbook of last summer was Rebecca Rathers The Pastry Queen. I didn't have high hopes for this book when I ordered it, other than a few reviews on Amazon and someone who had said that Rather seemed like a Texan version of Nigella Lawson. Still, I was intruiged and when it turned up, I was charmed, beguiled and seduced by the book.
The recipes are unlike any others that I had cooked before; cafe style cakes and muffins, unusual Tex-Mex hybrid dishes and classics, like Chicken Pot Pie and Chocolate Chip Cookies. I cooked from it incessantly.
The Pecan Pie Bars were, as every other Pecan Pie endeavour I've had, a runny but tasty failure.
The Whole Lemon Muffins were delicious, tangy and moreish.
The Peach Kolaches tested my baking skills but I was rewarded with rolls that were softer than any other bread dough I had ever tasted.
Yet, as the Summer passed, Rathers book was replaced by Nigel Slater and Diana Henry, British food writers who intrisically understand the English desire for cosy comfort food. The Pastry Queen became relegated to the bottom of the pile.
That is until Paul mentioned that he has invited work colleagues over for dinner next weekend for a "Mexican Feast". Suddenly I thought of Rathers book and her section of unusual Quesadillas and Tostadas. I shoehorned the book out from the bottom of the pile, blew the dust off and started reading. It was as if I had been reunited with an old friend. I remembered recipes that I had cooked, some that I had long forgotten making (such is my short memory) and was pleased to see that my tastes had changed enough to consider making some of the recipes that I had previously skirted over. Such is the nature of the constant cook.
So, Friday Night, whilst sniffling over a cold, I decided to make something Summery and bright: Prawn, Parsley and Proscuitto Tostadas. Curiously I had everything in the house to make this dish: my grandmother had passed a packet of the paper thin Italian ham to us ("it's too stringy") and I had just purchased a pot of Curly Leaf Parsley to let die on the windowsill and keep the other twigs company. The scene was set.
I had never had Tostadas before so eating a crispy, open tortilla was somewhat of a novelty. However, the flavours were positively bursting with summery joy and whilst I would put a little less lemon juice in (Paul was a bit heavy handed with his squeezing of the lemon), it felt like a tiny piece of Baja in our living room. I also quickly fried the Prosciutto in a hot frying pan because I'm not keen on it 'raw'. It's up to you how you serve it.
PRAWN, PARSLEY AND PROSCIUTTO TOSTADA - serves 2
Ingredients:
2 Flour Tortillas
Prawns. The quantity depends on what size prawns you have and how much you like them. I put in about 30 smallish prawns for the two of us.
One Small Onion, finely chopped
1 Tablespoon Lemon Juice
Small Handful Parsley, roughly chopped
1 Large Spring Onion (or two small ones), chopped, including greenery
1 Clove Finely Chopped Garlic
3 Tablespoons Olive Oil
1 Splash White Wine Vinegar to taste (the recipe asks for Champagne Vinegar so use that if you have it)
Salt and Pepper to taste
1 Yellow, red or orange Pepper, chargrilled (over a gas flame or under a hot grill whilst you are preparing the prawns - takes about 20 minutes under the grill, less over a flame)
8 Slices Prosicutto
Handful of Mixed Lettuce Leaves (preferably small leafy ones)
Sour Cream (optional)
METHOD:
Pierce the pepper all over and place under a very hot grill (in a baking tin to collect any juices it will leak out) or over a gas flame.
In a large frying pan, heat the olive oil and saute the onion until softly transclucent.
Add the garlic and spring onions and cook until the whole mixture has started to collapse and is fragrant. Do not let burn.
Roughly chop the prawns and throw them into the frying pan. If they are raw, cook until they turn pink. If already cooked, just heat through.
Remove from the heat, add the lemon juice and vinegar, judicially at first, tasting as you go along. Season well.
Optiona: In another frying pan, throw in the pink rags of Prosiuctto and cook over high heat until they curl and crisp up, about 30 seconds. Remove to a plate.
In the same frying pan, or under a hot grill, toast the tortillas until they brown and are crisp.
Assembling the Tostadas:
Stir the salad greens through the prawn mixture and divide between the two tortillas. Top with the Prosciutto.
Peel most of the blackened skin from the pepper and cut into thin strips. Drape these on top of the Tostada.
Add some sour cream if desired, although not necessary.
Apply to face and have napkins to hand!
reade more... Résuméabuiyad

SUGAR HIGH FRIDAY #27

As with the Hay Hay It's Donna Day event, this is also my first time parading my food for all to see for Sugar High Friday! SHF is a popular food bloggers event, with people from all over the world participating, sending in photographs of sweet concoctions all based on a specific theme. The results range from the fun to the sophisticated to the 'how the hell did they make that?' It's a great way to get to know other food bloggers and if you feel a bit sluggish in the kitchen gives you a kickstart with its monthly themes.
This month, SHF #27 is being hosted by David Lebovitz and the theme is Chocolate By Brand. This deceptively easy task should have been a breeze for me except that there are about 400 million chocolate recipes out there and I want to eat them all! I had planned on making, respectively, chocolate brownies studded with chocolate celebrations, mexican mole muffins, a rich chocolate cake sprinkled with homemade crunchie bar pieces and much more besides. However, it was a book that I never though I'd be able to cook from due to the complexity of the dishes: Winning Styles Cookbook (I mean, Poached Crown of Shrimp with Oregon Morel Mushroom Ragout, Green Asparagus Coulis and Madeira Mushroom Cream?). However, as I was idly flipping through it, a recipe - the very last one in the book - conceived by chef Robert McGrath jumped out of the book and grabbed me by the (metaphorical) throat. Here then, is my take on his Milk Chocolate and "Cowhide" Turnovers with Strawberry Sauce.
This recipe is actually quite simple though a little fiddly and it does rely on using good quality chocolate to get a strong, punchy flavour. Let me elaborate. The Cowhide element is simply two types of marzipan, one natural coloured and the other stained dark brown with Green and Blacks Cocoa Powder. I used Green and Blacks because I have never found a cocoa with such an intensely dark, rich flavour. Other brands of cocoa simply fade into the background compared to this. I always have a pot of Green and Blacks cocoa in my cupboard which I use sparingly and only on special occasions (it's excellent quality has a price tag to match).
This dark coloured marzipan is then ripped into small pieces and rolled into the white marzipan to produce the Cowhide effect you see below. It is then cut into circles and filled with a chocolate and cream cheese truffle-like filling and folded in half to make a marzipan pasty. The final result is a fun little dessert, a perfect appetizer for a Tex-Mex meal.
McGrath served his with a strawberry sauce although having tasted the Cowhide pasties, I don't think the two flavours would marry that well so I have omitted that element (not to mention that strawberries at this time of the year are not good). I also used a dark chocolate filling instead of milk chocolate, for no other reason than I had no milk chocolate in the house (it inevitably gets eaten).
So, I hope that you all enjoy my western themed photo shoot, utilising Demerara Sugar for Sand (well, we did want to eat the pastys afterwards), a cactus and bottle of Jack Daniels. Hey, I'm in rainy England and these are the best props I could muster!
reade more... Résuméabuiyad

A Greek Supper


So let me get this straight: I am not Greek (as my photo attests) nor have I ever been to Greece. However, I have a deep affinity for Greek food, its tangy olives, sharp feta cheese, aromatic fresh Thyme and sour preserved lemons. I adore their love of sweet, sweet confectionaries and how they fold gossamer fine Filo pastry into intricate shapes, seemingly effortlessly.
I suppose because I hate the cold weather, the persistent rain and the needlessly expensive drab food, Greece seems to be everything Britain isn’t: warm and sunny with simple spicy food that is cheap but always flavourful. In particular, the Meze are alluring, the concept of eating small platefuls of different foods appealing to my greedy nature.
In the past I have recreated Moussaka, both vegetarian (loaded with garlic and layered with shiny purple aubergine) and with minced beef (lamb still strictly off the menu when I’m cooking for other than Paul and myself). I have also prepared my own version of Pastitsio (pasta with meat, topped with a white sauce) and stuffed vine leaves.
What I enjoy about Greek food, apart from its distinctive bold flavours, is the ability to replicate those dishes you had on holiday (or in a local Greek Taverna) with great success. Because Greek food is so popular, most ingredients (like Vine leaves or Feta Cheese or Filo Pastry) are commonplace in the supermarket nowadays. With time and patience you could even make your own Baklava and Spanakopita.
Whilst the days are still windy and rainy and I get splashed by thoughtless drivers as I scuttle to and from my car each day, I like to cook robust meals that stick to my ribs and make me feel bolstered from the world. To me, Soutsoukakia is the Greek version of what is arguably the ultimate cosy food, Spaghetti and Meatballs. However, I may cause controversy by stating that Soutsoukakia is a superior dish, if only because the spaghetti is removed and replaced with Bulghur Wheat instead and the tomato sauce in the Greek version is robust and full bodied.
Soutsoukakia is Minced Beef Rissoles, seasoned with fresh Parsley and Cumin, cooked in a rich, slow cooked tomato sauce, and served over Bulghur Wheat that is in turn cooked in its own oniony/tomato sauce. Easy enough to prepare if a little fiddly but well worth it and - according to Paul - the flavour improves of the rissoles as they cool.
SOUTSOUKAKIA serves 4-6 depending on hunger/greed
Ingredients:
Meatballs:
500g Ground Beef (you could use a combination of beef/pork)
100g Breadcrumbs
1 Large Garlic Clove, minutely chopped
Small Handful of Chopped Parsley
1 Medium Egg
1 Teaspoon Cumin
1 Teaspoon Salt and good grind of Pepper
Vegetable Oil for frying
Some Flour for dusting
Tomato Sauce:
2 Tbsp Olive Oil
1 Can Chopped Tomatoes
75ml Red Wine (whatever dregs you have left is fine)
75ml Water
1 Bay Leaf
1/2 Teaspoon Cumin
Pinch Dried Thyme
Salt, Pepper and pinch of Sugar to taste
Bulghur Wheat Pilaf
6 Tbsp Olive Oil
1 Onion Finely Chopped
1 Large Choppped Tomato
4 Chopped Peppers preserved in Olive Oil (or chargrill your own)
1 Tin Chick Peas
225g Bulghur Wheat
1 Teaspoon Tomato Puree
Salt and Pepper to taste
550ml Stock or water

METHOD:
To make the Rissoles, place all the ingredients in a bowl and mix well with your hands.
Put some flour on a large plate.
Form the minced beef mixture into sausage shapes, around 3" long, 1/2" wide. Coat with flour, dusting off excess.
Heat 3-4 Tablespoons Vegetable Oil in a shallow frying pan.
Fry the lightly floured Rissoles, 4 or 5 at a time, until golden brown on each side. They do not need to be cooked through at this stage.
Remove to a plate with some kitchen paper and leave to drain.
Making the Sauce:
Using the same pan that you fried the Rissoles in (but discard any fouled oil), heat the olive oil gently in a saucepan and saute the onion and garlic until softened.
Add all the other ingredients and turn up the heat to a brisk simmer. You want to reduce the sauce so it becomes thick and unctuous. It should be ready after about half an hour.
Add the Rissoles to the sauce, turn down the heat to a gentle simmer, cover and cook for another half an hour.
Meanwhile, make the Bulghur Wheat Pilaf.
Heat the oil in a large saucepan then gently saute the onion with the Chick Peas. Once the onion has softened, add the chopped tomato, peppers and tomato puree. Cook for another minute, then stir in the Bulghur Wheat, making sure it is well coated in the tomato/onion/chick pea mixture.
Season well and pour over the stock or water. Turn down to a very gently simmer and cover. Leave for 15 minutes after which time the liquid should be absorbed. Remove pan from the heat and leave for 5 minutes to allow the Wheat to fluff up.
Serve the Rissoles and Sauce over the Bulghur Wheat.
Enjoy!
reade more... Résuméabuiyad

Hay Hay It's Donna Day!

Tami over at Running with Scissors is hosting this months Hay Hay It’s Donna Day. Now, I am not at all familiar with Donna Hay but that’s just our little secret (actually, I think she deserves some further investigation on my part!).
Apparently though, the premise of the event is this: a Donna Hay recipe is chosen and then we have to put our own spin on it. Previous months have seen Risotto, Savory Tarts, Macaroons and Fritters.
This month however, Tami has set us a real task, guaranteed to send hundreds of people fleeing for cover under their aprons and pudding basins: Soufflé!
Soufflés put the fear of God into people for one reason only: egg whites. They can be notoriously unstable and if you are a little careless or don’t take the due care and attention of your egg whites, they can literally turn your dish into a runny plate of ooze or a big eggy lump.
I’ve only made Soufflé once before and that was a basic (but no less delicious) cheese one. I can’t remember where I got the recipe from or even what type of cheese I used, I just remember making a cheese sauce, folding it into the egg whites, pouring the ethereal mixture into small ramekins and ovening for 15 minutes or so, then smugly thinking to myself “this isn’t so hard”. Actually, they tasted excellent and rose a good inch or so about the rim of the ramekins.
This time around, the recipe we have to adapt is a Cheddar Cheese and Spinach Souffle. I suspect that there will probably be some sweet soufflés entered and that will certainly be the next logical step for me in realm of the soufflé. However, we had no dinner prepared tonight so I decided to make a savoury one, using the basic egg/sauce blueprint but playing around with the main flavours.
I have mentioned many times before that my cupboards and refrigerator are like a series of murky and sometimes scary catacombs. Climb in too far and you never know what might leap out and bite you. I was reminded of this fact whilst searching for a spare pack of butter the other lunch time as my fingers sank into a very old log of Goats Cheese that I had been hording since before Christmas. I gingerly sniffed it. It smelt as Goats Cheese always does: a bit like day-old urine (you think that’s bad? I recently bought a Selles Sur Cher that smelt just like decaying broccoli and as for Vacherin!). With that the wheels were set in motion. I had bought the Goats Cheese and sure as well was going to use it!
On the very same day, rediscovering the Goats Cheese, a rather large Butternut Squash decided to roll off the work surface straight onto my foot. I figured this to be some sort of sign (no, not of my own inherent untidiness) and mentally put the two together. But I felt it needed a third element, a herb if some sort...something seasonal. Fresh Thyme! I know that Thyme works well with both Squash and Goats cheese so the triumvirate was in place: I would make a Roasted Butternut Squash, Goats Cheese and Thyme Soufflé! And that is exactly what I did. I am proud of this recipe, not least because it is completely of my own design but because it tasted delicious! Sure, it’s not a high riser but that could have something to do with the shelf being too high or perhaps the Squash being quite a stodgy vegetable. Whatever. It rose a little, tasted great and had all the attributes of a Soufflé. We served it with the remainder of the roasted Squash and some Ciabatta Bread to mop up the cheese sauce (although a salad would have been preferable).
Here then is the recipe:
FREYAS ROASTED BUTTERNUT SQUASH, GOATS CHEESE AND THYME SOUFFLE Serves at least 4
Ingredients:
1 Butternut Squash, cut in half then chunks (you will need 400g cooked)
About 10 sprigs of Fresh Thyme
200g Goats Cheese (I left the rind on), which equates to about 2 small logs, depending on your personal taste
4 Tablespoons Plain Flour
70g Butter
2 Cups Milk
Salt and Pepper
4 Eggs Separated
20g Breadcrumbs
Pinch Dried Thyme
METHOD:
Preheat the oven to 200c.
Place the unpeeled chunks of Squash on a roasting sheet, drizzle with a little olive oil and sprinkle with Thyme leaves. Roast until a knife point pierces the flesh easily (about half an hour). Leave to cool.
Meanwhile, infuse the milk with a sprig of Thyme (bring up to boiling point, turn off and let steep).
Turn the oven up to 220c.
Butter a 2 Pint Souffle Dish (or 4 small Ramekins). Mix the Dried Thyme with the Breadcrumbs, and dust the buttered the Souffle Dish with the mixture. Discard any unstuck crumbs.
In a medium sized saucepan, melt together the butter and flour until it has formed a golden smooth paste. Pour over the infused milk and whisk like the fury until it thickens. Crumble over the Goats Cheese and remaining Thyme leaves (discarding stems). Taste for seasoning. Turn heat down to very low.
Remove the papery skin from the Squash and weigh out 400g. You can serve the rest on the side. Mash in a bowl then stir into the cheese/Thyme sauce. It will turn a beautiful pale peach colour, dotted with tiny green leaves.
Remove from the heat and beat in the Egg Yolks. Leave to cool to room temperature.
Whisk the egg whites in a grease-free bowl until softly peaking.
Gently fold into the cheese sauce until thoroughly amalgamated, then pour into the prepared Ramekin(s).
Bake for 15 minutes (small Ramekins) to 20 minutes (large dish).
Serve immediately with a salad and the remaining roast squash.


reade more... Résuméabuiyad

An Antonym of a Homonym

(DISCLAIMER: The opinions expressed in the following article are meant to be humorous and will hopefully be read in the way it was intended.)

There are two things that Texans think they do better than anybody else in the world. The first is criminal justice and the second is chili. I may ruffle a few feathers, but I disagree on both points. As much as I would love to get into a political debate about the importance of a public defender program or the necessity of DNA evidence, it's probably best that I stick to a topic which is more in keeping with the mood of this forum. While I can speak intelligently on the subject of capital punishment, I am an even greater authority on chili. After all, it's my prerogative as an American Male.

Searching for Texas chili recipes on-line yields a wide variety of results. There are numerous sites claiming that proper chili should just be meat, chilies, and seasoning and that any additional ingredients only serve to dilute the flavour; most sites claim that chili is a Texas invention; and all the sites are committed to the lie that nobody but a Texan can make decent chili. Without exception, these sites also focus on red chili and neglect the interesting variants such as white chili and, MY favourite, green chili.

I'm not saying that Texan chili is bad; far from it! I'm simply saying that it's very narrow-minded to consider it definitive. Also, I have a difficult time understanding food possessiveness. I know if I invented something that I thought was good enough to share with others, I would also want it to have the broadest appeal to the biggest marketplace. Following a memetic formula, this sometimes requires adaptation. I would be happy to think that somebody had altered my creation to suit their own needs, provided I got royalties and there was no copyright or patent infringement, of course (I am also a realist).

I know what motivates the Texan mindset. Occasionally a native Texan ignores his innate xenophobia and travels further north than the Oklahoma panhandle and it may be possible that, like me, they've seen a billboard advertising the "Worlds Greatest Chili" at the next truck stop. They've stopped in not because of the promise of Worlds Greatest, but because the word Chili is decidedly alluring. They sit down at a greasy booth with a bitter cup of coffee hoping for reassurance and a taste of home and discover that some parolee has made a mockery of a sacred dish by pouring kidney beans into Campbells Tomato Soup. And I couldn't agree more. I lived this experience in Nebraska, or was it Iowa? I skipped the "4lb. Cheeseburger: Eat the whole thing in an hour without puking and get a T-shirt!" and went for the promised Ambrosia. I swear it was Hormel chili with some cheese grated on top. It left me feeling empty, cheap, and exploited. Never again!

I have already stated that Texas doesn't make the worst chili in the world, but maybe I should explain why I don't think they make the best either. The reason is because some guy whose name I don't know in the backwoods of LaCrosse County, Wisconsin makes the best (red) chili in the world. I've only had it once and have spent more than half a lifetime trying to recreate it. I know it had three unusual ingredients in it. The first being potatoes. I have never made a chili since without including cubed potatoes in the mix. The second being V8 juice. Certainly you can make a good chili without V8, but a lot of guess work is removed just by adding this. The third ingredient, the one I have never used or had in anybody else’s chili is venison. The guy who made this chili was a typical Wisconsin outdoorsman and so was never far from a can of Old Style, an ice fishing shanty, and a dead white tail buck. He may not be the kind of guy I would like to be around on Super-Bowl Sunday, but he would be the first guy to see for advice on a barbeque.

I have recreated the memory of that chili as well as I possibly can without the addition of venison as this has always proven a bit elusive to me. If you're a Texan, you're probably just itching to execute me, but I dare anybody else not to enjoy this recipe.

PAULS RED CHILI
Ingredients:
500g extremely good quality cubed steak, stewing meat is perfect
500g lean ground beef
2 large onions diced
5 stalks celery diced
2 large peppers diced
3-4 chili peppers sliced, seeds and all
500ml V8 juice
2 tins chopped organic tomatoes
2 tins kidney, pinto, or black beans (or a mixture)
2Tbsp chili powder
1Tbsp sugar
salt to taste

METHOD
Over medium heat, sweat onions, celery, peppers, and chillies for about 10 minutes.
Stir in the steak and allow to brown on all sides for about 5 minutes.
Add the ground beef, but don't break it up completely. Leave bite sized chunks for texture. Stir in chili powder. Cover and simmer over low heat for about 20 minutes.
Add all remaining ingredients, cover, and simmer over low heat for at least two hours.
Turn off heat and let stand overnight. Reheat and serve the following day in a bowl with grated cheese, fresh spring onions, and sour cream on top. If you're English, you'll feel compelled to serve this over rice, but it is completely unnecessary.

Like all tomato based sauces, this recipe only improves with age. I like it best after about five days, but it's always gone before then. It's like hanging a pheasant; wait a while and you'll be rewarded, wait too long and you'll have a big festering mess.
reade more... Résuméabuiyad

SOME PRAWNS AND A COUPLE OF SNAPPERS....

Before I get onto the food, something a little bit different...
You may be wondering why, after all this time, Paul and I have decided to display, what can only be loosely described as a mugshot of ourselves. Well, after reading a post by one of my favourite food bloggers, Brilynn at Jumbo Empanadas, I discovered that there is a new event called Behind the Apron being held by Christiane at 28 Cooks asking food bloggers to reveal their actual faces, instead of hiding behind clever/obscure/baffling profile pictures. So without further ado (people of a delicate disposition should leave now...)
And if you have recovered from the shock of seeing Freya and Paul in all their sozzled glory (but those Long Island Ice Teas were great!), onto the food which is much more photogenic:
After the Bocconcini, I was planning to make the aforementioned Ricotto Fritters but it seems like that plan is doomed. We felt that our arteries were crying out for a little breathing space so I decided to cook something light, healthy and spicy, hence Stir Fried Prawns and Spinach.
This is adapted from a recipe from Keith Floyd's Curries, a really great book for people who like a bit of extra heat with their meat (er, or something). I had some frozen raw prawns that cried out every time I opened the freezer "we've been here over two weeks and you've not even given us a second glance, look at our grey, frozen bodies, just waiting to be turned pink again, like a corpse waiting to be embalmed at the undertakers...." I guess all that cold, Northern Sea air must have played tricks with their minds (or mine...).
Anyway, this is a quick, tasty, delicious and nutritious dish, perfect for when you feel like you need a little post-weekend (or post Bocconcini) restoration.
STIR FRIED PRAWNS AND SPINACH
Ingredients:
250g Large Prawns, preferably raw but cooked will suffice
1 Garlic Clove, finely chopped
1 Small Onion, finely chopped
1/2 Teaspoon Garam Masala
1/2 Teaspoon Salt
1/2 Teaspoon Coriander
1/2 Teaspoon Tumeric
Pinch Chilli (to taste)
Pinch Ginger (to taste)
1 Tablespoon Tomato Puree
225g Fresh Spinach
Olive Oil
METHOD:
Heat up about a tablespoon of olive oil in a wok or large frying pan.
Saute the Onion and garlic until soft and fragrant.
Turn the heat up and add all the spices except the salt. Cook for about 4 minutes so the spices release all their optimum flavours.
Add the Tomato Puree, stir around, cook for another minute, then add the prawns.
When they turn pink (or, if they are already cooked, just heat them through), add some salt and then the spinach, stirring it swiftly in the pan until it just starts to wilt. Taste for seasoning and serve, as we did with some buttered rice or just as is.
reade more... Résuméabuiyad

Unusual Ingredient of the Week - Bocconcini

Or to put it another way, baby Mozzarella, literally translated as Little Mouthfuls.
I had been eyeing up this recipe by Nigella Lawson in Feast for some time but as is often the wont with Nigellas recipes, sourcing the ingredients was proving to be far more troublesome than the actual recipe itself.
So, as I went shopping yesterday, the plan was to buy some spinach and make ricotto and spinach fritters. My husband made Cannelloni with a similar filling on Friday Night and I love the creamy, savory flavour of the soft ricotta against the salty parmesan and the iron tang of the spinach.
I was lured over to the cheese section (probably by the 'aromatic' but terribly naughty Vacherin) and nestled discreetly, between big, burly buffalo Mozzarella balls was a pot of Bocconcini AND it was reduced to 79p. As you may have guessed by now, I get a subversive thrill from finding unusual items reduced and I hugged myself gleefully all the way home.
When I got home, I pulled out Feast and checked out the recipe which I found to be extremely simple although it did utilise hot fat. Still, I ploughed ahead and tweaked the recipe by adding a little Paprika and Black Pepper to Cornflour. I wanted them to have a little heat.
DEEP FRIED BOCCONCINI
Ingredients:
150g Bocconcini
40g Cornflour
1/4 Teaspoon Paprika (optional)
Black Pepper and Salt
1 Egg
50g Panko or Breadcrumbs
Vegetable Oil for frying
METHOD:
Heat enough vegetable oil to come 5cm up the side of a heavy bottomed saucepan.
Drain the Bocconcini. You should have between 14-18 in a pot so, working on a sliding scale of mildly peckish to extremely glutunous, this could feed between 2-4 people.
Pour the Cornflour into a sandwich bag and add the Paprika if using, Salt and Pepper. Shake well and add the little white globes. Make sure they are completely coated.
In a shallow dish, beat the egg.
Pour the Panko Crumbs into a second shallow dish.
Much in the same way as you make Mozzarella in Carozza, you will be getting a conveyer belt system going: out of the cornflour, coat in egg, smother in crumbs and into the hot oil.
They will go golden brown very quickly and if they haven't been coated properly in the mixture, the cheese will start to ooze out into the hot fat and spit at you like a hellcat (I know this for a fact, I have splatter marks on my arm).
Once golden - no more than 40 seconds to a minute - remove them from the oil with a slotted spoon and drain them on some kitchen roll. Leave to cool for a minute then enjoy!
These would taste delicious with a) Ketchup, my rather uncouth suggestion, b) Ranch Dressing my husbands suggestion, American through and through that he is and c) Sweet Chilli Dipping Sauce, my mums exotic input.
Or just enjoy them virginally plain.
reade more... Résuméabuiyad

A Little Science in the Kitchen


Normally I have an irrational fear of hot things that spit molten oil at me and generally being burnt. Hence, my husband always does the deep frying (we try to restrain ourselves from too much deep frying for I fear that if we were to start a weekly habit it would escalate wildly out of control and then where would we be? Deep frying the dogs food? Sandwiches for work?) and anything that involves extreme temperatures. This is probably one of the main reasons why I could never work in a professional kitchen although I have plenty of burn scars to justify my fears.
Therefore it should come as a bit of a surprise to hear that this weekend I made Honeycomb. For those of you not familiar, the process of making Honeycomb involves a bubbling, lava hot sugar syrup that is sprinkled with Bicarbonate of Soda which then erupts into furious golden pockmarked cinder toffee. It involves a sugar thermometer and that has indicated failure in the past, due to my abject lack of patience: "Well, the recipe says 150c but surely 120C will do?"
English readers will know Cinder Toffee or Honeycomb in its most familar incarnation: Crunchie Bars, chocolate coated Honeycomb and American readers will know it by the more romantic Seafoam (an apt description of the most dangerous procedure of manufacture). The homemade version, I am pleased to report, is much, much nicer and, in spite of the burn threat, very easy to make.
I had seen a recipe for a Marmalade and Honeycomb Cake in a Sunday Magazine (which shall remain nameless) and decided there and then that I had to A) bake the cake and B) buy the book from whence it came (the Duchy Originals Cookbook). Sure enough, this Christmas, my mother - a staunch royalist and Prince Charles fan - bought me the book. All politics aside, the book has some delicious and simple recipes and the mantra of Organic, Organic, Organic is beguiling.
But I digress. I decided to bake the aforementioned cake for Saturday Teatime. The cake itself is a simple butter, eggs, sugar, ground almonds batter pinpointed with a couple of tablespoons of Marmalade. When I licked the spoon, the raw cake mix tasted delicious, the delicate hint of tart Seville oranges a wonderful surprise.
The baked cake darkens to a deep golden brown and it is then split and filled with a layer of more Marmalade and whipped cream, sharpened with some Creme Fraiche (or Sour Cream) and mottled with pulverised Honeycomb. It tasted like an old fashioned cake, from another era altogether, gently orangy and with the slightly burnt tasting honeycomb. It is very rich.
The recipe for the Honeycomb makes quite a lot and it is very moreish although incredibly tooth-achey (which you could probably allude to the sugar, corn syrup and honey that it contains...). After tasting the cream that sandwiched the cake together, I feel certain that this blend would make an awesome ice cream too.
MARMALADE CAKE WITH HONEYCOMBED FILLING
Honeycomb:
Ingredients:
75g Honey
150ml Glucose Syrup (I used Corn Syrup)
400g Caster Sugar
100ml Cold Water
15g Bicarbonate of Soda
METHOD:
Line a large baking sheet with grease proof paper and put the baking sheet over some sheets of old newspaper. The reason for this? When you pour out the honeycomb it goes a bit crazy and might overspill the baking sheet. And, speaking from personal experience, it really is a bit of a sod to remove from a wooden work surface.
1) In a large pan, gently heat the honey, sugar, glucose (or corn) Syrup) and water until the sugar has dissolved and is no longer grainy. This may take 5-10 minutes.
2) Then, using a sugar thermometer as your guide, gradually heat this sweet syrup until it reaches 150c (this is called Soft Crack stage). It may take another 10 minutes to reach this point. The sugar will bubble wildly but it doesn't spit out (thank goodness).
3) Once it reaches 150c sprinkle over the Bicarbonate of Soda. Stir rapidly until all the powder has dissolved. The mixture will instantly change from clear to a rich golden creamy colour and look very, very frothy.

4) Pour out this frantically multiplying mixture onto your baking sheet and leave it alone for at least half an hour. Do not touch the baking sheet as it gets incredibly hot from the honeycomb.
Keep stored in an airtight jar or tin. It will start to go sticky after 2 or 3 days (if it lasts that long) but it is has a multitude of uses: crumbled over ice cream, drizzled with chocolate, pumice stone....
The Cake:
Ingredients:
250g Unsalted Butter, room temperature
250g Caster Sugar
3 Large Eggs and 1 Yolk, lightly beaten
250g Plain Flour
2 Teaspoons Baking Powder
50g Ground Almonds (which always promote a moist, long-lasting cake)
150g Seville Marmalade
METHOD:
Preheat Oven to 180c. Grease and flour an 8" Round Cake Tin.
Cream together the butter and sugar until pale and fluffy.
Gradually beat in the eggs until amalgamated. If the mixture starts to curdle, sprinkle over a little flour and beat frantically.
Sift the flour and baking soda into the mixture, add the ground almonds and mix well.
Finally, stir through the Marmalade, just so it mottles through the batter. You want stripes of it running through the cake.
Pour gently into your prepared cake tin and bake for 45-50 minutes. Take care as the marmalade in the cake can catch quite easily (I had to shave off a little of the edge of the cake as it blackened slightly. This didn't affect the final product though).
Turn out onto a cooling rack and leave to cool completely.
When cool, carefully cut in half and fill with the cream.
The Cream:
Ingredients:
2 Tablespoons Marmalade
100ml Double Cream
50ml Creme Fraiche or Sour Cream
100g Honeycomb, blitzed in a blender until it resembles a nubbly rubble.
METHOD:
Whisk the cream until it softly peaking. Stir in the creme fraiche (or sour cream) and the honeycomb rubble. Spread the bottom layer of cake with the two tablespoons of marmalade and then spread thickly with the cream mixture. Put the top layer on and leave to set in the fridge for an hour (if you can stand it!).
Enjoy!

reade more... Résuméabuiyad

How Much Butter??

Flapjacks are a real taste of childhood. I remember standing next to my mum at the cooker, stirring, stirring oats in warm, melted sugary butter, until they glistened. Then we would press the sticky mixture out into a baking pan, baking them until the kitchen was filled with the smell of butter and hot oats. Sometimes we would pour melted chocolate over the top, once they had cooled. Other times we had them just plain, still warm from the pan so they crumbled into your lap as you tucked into them.
It seems to me that you reach a certain age when you ‘grow out’ of the treats that you begged your mum to make when you were just that bit younger. They become old-fashioned and are replaced by things like Big Macs.
Since reaching 30 though, I have become fascinated with those ‘old-fashioned’ foods, the foods that my grandmother made and her mother before her. Kathryn at Kathryn Cooks with Jamie recently wrote about a similar phenomenon when she made a beautiful Victoria Sponge, oozing with pure white cream and red, red berries. All of a sudden, these foods that we eschewed for more ‘sophisticated’ cuisines are piquing our taste buds again.
Nigella Lawsons How To Be A Domestic Goddess is virtually a bible devoted to home cooking as we remember it and is indispensable for her cheese and onion pasties, scones and fairy cakes (which got replaced sometime in the late 90s by the ritzier, glitzier Cupcake – Americas culinary version of the Barbie Doll compared to Britains Sindy Doll: bigger and blonder if everyway).
I hadn't eaten Flapjacks in probably ten years when, flipping through the Green and Blacks chocolate cookbook, I glanced upon a fabulous sounding recipe for Chocolate (what else?) Flapjacks.
"Do you like Flapjacks?" I asked Paul, "Sure" he replied and so the wheels were set in motion. I left him to his blog tweaking whilst I retired to the kitchen and started gathering all the ingredients.
I was a little shocked (and my heart valves gave an extra wince as well, I'm sure) when I read the quantity of butter: 350g! This is one and a half English size packs! Or, to put it another way, a big, huge lot!
As luck would have it, I only had one block of butter left anyway so I was forced to reduce the recipe by 100g or thereabouts. Mathematics is not my strong point but I did some judicial mental arithmatic and reduced all the other ingredients by eye. I think they turned out OK though, if maybe a little dry (my boss's comment, not mine).
The recipe also required two types of oats: Whole Scottish Oats (the only kind that Paul will eat, he being an Oatmeal expert) and Processed (or rolled) Oats. I rather reluctantly used Ready Brek for the latter although I have my suspicions that it was the Brek that contributed to the overall slightly dry texture of the Flapjacks. I can't resist Ready Brek though, I love its twinkly whiteness as you sprinkle into the bowl, like flakes of snow.
Anyway, I replicate the recipe in full here for you now. If you wish to be daring like me and reduce the butter and therefore the other ingredients, then go ahead. The reduced batch still made about 20 3" squares of delicious oaty goodness that are just crying out to be drizzled in some melted chocolate...
CHOCOLATE FLAPJACKS makes about 20 depending on what size you cut them into
Ingredients:
350g Butter
3 Tablespoons Golden Syrup
175g each of Soft Brown Sugar and Muscovado Sugar (I used light because thats all I had) to make 350g of sugar altogether!
275g Rolled or Processed Oats (instant oats)
150g Whole Oats
8 Tablespoons Cocoa Powder (Green and Blacks has the richest, darkest flavour but any good quality cocoa will do)
2 Tablespoons Shredded Coconut (optional)
METHOD:
Preheat Oven to 140c.
Melt the butter into a large saucepan (I made the big mistake of using a small saucepan and inadvertantly sprayed melted butter and sugar on my new sweater - sorry Mark and Sarah!) over low heat. Add the Golden Syrup and Sugars and stir until the granules have melted. Do not let boil.
Add all the other ingredients, removing pan from the heat, and stir well to combine. You should have a shiny, dark mixture.
Press into a greased pan about 7" x 11" square and bake for 18-20 minutes. They need to be still soft in the middle to have that delicious chewy texture.
Wait for 20 minutes, then cut into squares. Do not remove from the tin until cold. Drizzle with some melted chocolate if desired. N.B. they do sort of resemble clumps of dried horse manure but don't let that put you off!
Enjoy!
reade more... Résuméabuiyad