Pages

More News!

For all who follow my food column, Kitchen Parade -- well, it's got a brand-new 'kitchen'!

Check out the new digs, finally, over at KitchenParade.com!


SO WHAT IS KITCHEN PARADE, EXACTLY? Kitchen Parade is the food column that my Mom started writing for our family newspaper when I was a baby. Today it's published in my hometown newspapers in suburban St. Louis and features 'fresh seasonal recipes for every-day healthful eating and occasional indulgences'.

Where A Veggie Venture is 'pure food blog', full of experimentation and exploration, Kitchen Parade features recipes a modern cook can count on. All are thoroughly tested by a home cook in a home kitchen and many are family and reader favorites. All recipes feature easy-to-find ingredients, clear instructions and because I believe so strongly in informed food choices, nutrition analysis and Weight Watchers points. Want to know more? Explore the brand-new Kitchen Parade, including Kitchen Parade's Recipe Box!

WHY CAN'T I COMMENT ON THIS PAGE? Because I hope that you'll click through to the actual column and comment there!

A Veggie Venture is home of the Veggie Evangelist Alanna Kellogg and vegetable inspiration from Asparagus to Zucchini. © Copyright 2007
reade more... Résuméabuiyad

Ripe-Tomato Relish with Peaches & Pears ♥ aka Sharon's Pickle

Today's vegetable recipe: Our old-old family recipe for Ripe-Tomato Relish. It’s a day’s production but there’s nothing the least it “hard” about it either. My mom and I used to make this together, now I manage it alone and it’s so very satisfying, hearing the canning jars go “pop” and storing away jars for later. Not just vegan, "Vegan Done Real".

Ripe-Tomato Relish is almost but not quite as thick as chutney. It's made from perfect summer tomatoes, peaches and pears. Even with fruit and sugar, it’s a savory relish, not a sweet jam.

In my family, we call Ripe-Tomato Relish "Sharon's Pickle" because my cousin Sharon has loved it so much for so long. The recipe comes from her Grandma Miller so it's now in at least the third generation. I need to work on the fourth generation, who are busy bearing babies aka the fifth generation!

Ripe-Tomato Relish is spectacular paired with pork, especially. But I often throw a tablespoon or two into chicken salad or egg salad or with sliced meat in a sandwich instead of ketchup or another spread. It's just one of those specialties that's, well, always special. I make it in pint jars for my own use, in half pints for gifts – it always gets rave reviews.

When my mom was alive, we'd make it together in May with tomatoes she and my dad hauled from Florida on their way north for the summer. It takes lots of chopping – so company does make the job fly by faster. But even working in solitude, it's nice, about two hours of prep work, then a long time on the stove, then quick work to fill and process the jars in a hot water bath.

What is a hot water bath? It's when you carefully place sterilized jars filled with the hot relish into a big vat of boiling water. It seals the jars to lock in flavor and color and destroy microorganisms that cause spoilage. NOTE: I'm the first to process jars of Sharon's Pickle. My mother, my aunts and certainly Grandma Miller never did. But canning specialists do recommend processing home-canned foods in hot water baths, even relishes with high vinegar content like this. And after all the hauling, all the blanching, all the peeling, all the chopping, all the time on the stove, the hot water bath seems like one last safe – and simple – step. And so I do.

If you're new to canning, check out my Practical Home Canning Tips, a sort of "what I wish I'd known beforehand" list I wrote four years ago during the Summer of Obsessive Canning.

And here's a quiz. Besides the lineup of pickles and preserves and jams and jellies, what's the most satisfying moment of home canning? It’s the "POP" that happens when the jars seal. There goes one now!

RIPE-TOMATO RELISH with PEACHES & PEARS
(in my family, we call it just "SHARON's PICKLE”)

Hands-on time: allow a whole day, about 2 hours for prep work, then several hours stove-time with frequent attention, then about an hour for filling and processing
Makes about 10 pints

6 large peaches
30 medium-size ripe tomatoes (about 14 pounds)
6 medium yellow onions
3 green peppers
2 jalapeño peppers (my addition)
6 pears, peeled and diced
4 cups sugar
1 - 2 cups (or more) white or cider vinegar or a mixture
2 tablespoons table salt
2 tablespoons pickling spices

BLANCH THE PEACHES AND TOMATOES Fill a large pot with water and bring to a boil for blanching the peaches and tomatoes. (To “blanch” is to cook quickly, just enough to soften the skins so that they’ll release easily from the fruit.) Wash the peaches and tomatoes well, I usually wash them first, then let soak in cool water to remove any further dirt.

For the peaches, drop the peaches into the water three or four at a time. Blanch for 1 minute until the skin splits, transfer to a colander to drain, then onto a baking sheet to cool. Let the water return to a boil before adding more.

For the tomatoes, cut an X in the skin of the blossom end of each tomato, then four or five at a time, drop into the boiling water. Cover and blanch for 1 - 2 minutes til skin splits, transfer to a colander to drain, then onto a baking sheet to cool.

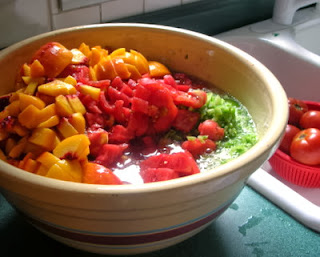
When cool enough to handle, peel and then chop the peaches and tomatoes, discarding the peels and adding the pieces, juice and seeds and all, to a very large bowl.

PREP THE VEGETABLES In batches chop the onion, green pepper and jalapeno in a food processor and transfer to the bowl. Add the pears, sugar, vinegar and salt. Stir gently to combine.

PICKLING SPICES Wrap the pickling spices in two or three squares of cheesecloth or staple the spices in folded-over coffee filters, you’ll need as many as you have cooking pots.

COOK DOWN-DOWN-DOWN Fill two or three large, heavy pots about 2/3 full. Leave the covers off, bring the pots to a boil and let simmer until the liquid cooks off. Especially at the beginning and near the end, stir ever 15 minutes to monitor the temperature. My notes from other years say this takes 2 - 5 hours. My last couple of batches had so much liquid, it took nearly 9 hours to cook. Three pots make a difference, it’s easier for low heat to reach into the deep mixture. At some point, you will want to combine the pots, however, so that there is just “one” flavor mixture.

TASTE FOR VINEGAR A couple of hours in, taste the mixture. It needs to have a strong vinegar component, if it doesn't, add vinegar. Keep tasting throughout the cooking process as it cooks down, add vinegar along the way as needed. (My mom and I made a very unsuccessful batch one year, we realized too late it was because we didn't use enough vinegar.)

WHEN IS IT DONE? It's done with the liquid is cooked off and the whole mixture has turned a beautiful shade of reddish mahogany-brown. There are two ways to “hold” the mixture overnight – say if it's time for bed and you don't have the energy to fill and process the jars right then. The first is to refrigerate. The second is to cover and place in a 190F oven. (I actually “held” the mixture overnight in the oven twice in 2013, it worked just fine.) In the morning, return the mixture to a boil but be careful, once it's fully cooked, it's easy to accidentally burn the bottom.

FILL & PROCESS THE JARS IN A HOT WATER BATH Fill sterilized hot canning jars with the hot mixture and top with sterilized hot lids and rims. Immediately drop into boiling water and process for 10 minutes. Need more information on how to do this? Practical Home Canning Tips may help!

HOW LONG DOES IT KEEP? Use Ripe-Tomato Relish within a year or two.

ALANNA's TIPS & KITCHEN NOTES
TOMATOES It’s important that the tomatoes be really ripe. This means that the tomatoes might be a little bruised. Once the skins come off, they may be fine but be sure to cut off any actual bruised part.
PEARS Because pears aren't in season at the same time as peaches and tomatoes, I use three 15-ounces cans of pears in light syrup, including the syrup, the fruit diced small.
POT SIZES This recipe makes a lot! That means big pots are needed. I collect the chopped peaches, tomatoes and vegetables in a my mother's old bread bowl which holds 5 quarts and even it's not enough. For cooking, I use either a very large stockpot and two Dutch ovens or more recently, the very large stockpot and a large LeCreuset Dutch oven.


A Veggie Venture - Printer Friendly Recipe Graphic


Still Hungry?


MORE JAMS, PICKLES & PRESERVES
~ Homemade Zucchini Relish ~
~ Tomato Ginger Jam ~
~ Green Pepper Jelly ~
from A Veggie Venture

~ How to Make Rhubarb Jam & Rhubarb Jelly ~
~ Slow-Roasted Tomatoes ~
~ Cranberry Chutney ~
from Kitchen Parade

A Veggie Venture is home of the Veggie Evangelist Alanna Kellogg and vegetable inspiration from Asparagus to Zucchini. © Copyright 2007
reade more... Résuméabuiyad

Delicious Microwave Sweet Potato ♥

A sweet potato cooked in the microwave is so easy, so good!
Today's microwave recipe: How to cook a sweet potato in the microwave. It's quick-quick and easy, whether for a fast at-home or office-kitchen lunch or a vegetable for supper.

I didn't mean to mislead. So many readers have clicked on 'microwave sweet potato' -- but wait! don't waste a click, that link leads only to a review of a plastic-wrapped 'microwave sweet potato' that costs twice as much and just isn't necessary.

It is so easy to cook a regular sweet potato in the microwave. It's my new go-to lunch! Plus since so many offices have microwaves, this could be a great lunch for work, too - though beware, it takes 10 minutes (or more) to cook a sweet potato in a microwave so might violate office etiquette during prime 'leftover reheat' times.

The source of this microwave technique for cooking sweet potatoes is the always reliable Vegetable Love by Barbara Kafka. Her vegetable cookbook is just so completely thorough! Barbara writes that microwaving a whole sweet potato is suitable for purées and pies, which intimates, doesn't it, that the texture is unpalatable for eating straight from the jacket? Not true! Just slice open a sweet potato cooked in the microwave, add a bit of butter and seasoning and voila, call it lunch! The texture is lovely, the taste is great!
Keep Reading ->>>
reade more... Résuméabuiyad

Phyllis' Fresh Tomato Sauce ♥

Fresh Tomato Sauce
How to make tomato sauce, not for canning, but fresh for supper. Make it with summer's best tomatoes and eat straight-away, still-warm from the stove, laced with the essence of basil.

~recipe & photo updated 2010~

2005: In the years I was digging my roots as a cook, I had the great fortune to move to Texas - the good luck having zero to do with Texas itself and everything to do with the fact that my mother's best friend from grade school lived all of two miles away. Phyllis and her husband tucked me under their culinary bough and on occasion, I'd spend a Sunday on a stool in their kitchen, some times helping, mostly wide-eyed and soaking up the possibilities: I'd never heard of the stove-maker Viking, had never known a house with two ovens let alone a third, especially for warming.

So I have a whole collection of recipes bearing Phyllis' name. This is one. You'll see, it's not fancy food (though Phyllis would chide me for not blanching the tomatoes to remove the skins) but it is what I hope you think of as 'classic Alanna', simple food prepared well. .

The one requirement is really good tomatoes. If you're going to make tomato sauce from fresh tomatoes, at least a sauce this simple, the tomatoes must-must be perfect. That said, my notes say that Phyllis also makes it from boxes of Pomi Tomatoes, a good choice when good tomatoes aren't available, as would be San Marzano tomatoes which I used to make Quick Tomato Sauce.

2010: This is simple, spare fare, an easy way to revel in summer tomatoes.

PHYLLIS' FRESH TOMATO SAUCE

Hands-on time: 20 minutes
Time to table: 30 minutes
Serves 4

2 tablespoons olive oil
4 large fresh garlic cloves, sliced thin
2 pounds fresh tomatoes, blanched and seeded first if desired, otherwise chopped in bite-size pieces
8 - 10 fresh basil leaves, washed, cut in slices
Salt & pepper to taste
1/4 cup cream (reduced from Phyllis' 1 cup, I just didn't think it needed very much)

For garnish, freshly grated Parmesan (if you like but to my taste, 'just tomato' is perfect)
For garnish, a few more leaves of fresh basil

In a large skillet, heat the oil on MEDIUM HIGH till shimmery. Reduce the heat to MEDIUM, add the garlic and let sizzle a bit. Add the tomatoes and basil, stir to coat with fat and distribute the garlic. Let cook for about 10 minutes, stirring occasionally, watching the heat so not to burn, til all the liquid is cooked off. Season to taste. Slowly stir in the cream, stirring to distribute. Let cook down a minute and warm completely through. Adjust seasoning.

Serve over pasta or fish. If desired, top with Parmesan and additional fresh basil.


ALANNA's TIPS & KITCHEN NOTES
If you are in Phyllis' camp about removing the tomato skins, blanch the tomatoes first. To blanch, bring a large pot of water to a boil. Wash the tomatoes and cut an X in the skin on the blossom end. (This is opposite the 'stem end'. Think about it, you'll know which is which!) Drop into the water for 60 seconds, remove with a slotted spoon. When the tomato is cool enough to handle, use a knife to slip off the skin and discard.
Don't skip the basil when making the sauce, it adds a dimension that is much missed if it's skipped.

A Veggie Venture - Printer Friendly Recipe Graphic


MORE FAVORITE RECIPES for SUMMER'S BEST TOMATOES
~ Fire-Charred Tomatoes ~
~ Tossed Caprese Salad ~
~ Tomato Platter with Olives & Feta ~
~ more tomato recipes ~
from A Veggie Venture

~ Shrimp with Tomatoes, Spinach & Feta ~
~ Summer's Tomato Soup ~
~ BLT for Pasta Salad ~
~ more tomato recipes ~
from Kitchen Parade, my food column


How to eat more vegetables? A Veggie Venture is the home of Veggie Evangelist Alanna Kellogg and the best source of free vegetable recipes with 700+ quick and easy favorite vegetable recipes, the Alphabet of Vegetables, Weight Watchers low-point recipes and microwave vegetable recipes.
reade more... Résuméabuiyad

Insalata Caprese ♥ A Simple Summer Treat

Insalata Caprese, the summer classic, just slices of perfect tomato and fresh mozzarella
Slices of perfect summer tomatoes and fresh mozzarella, drizzled with good olive oil and scattered with fresh basil. Gorgeous!

When I gushed over the taste of the summer's first tomatoes last month, several commenters suggested 'insalata caprese' as a simple way to revel in perfectly ripe home-grown tomatoes. "I've done that", I thought but then wondered, "Have I?" No, not really.

You see, way back on Day 87 (yes, I really did count each day during A Veggie Venture's first year, when I cooked a vegetable in a new way every single day, note to self: how mad was that?) I sliced tomato and fresh mozzarella and then drizzled it with good vinegar -- very good! delicious, in fact -- but not insalata caprese, which is drizzled with good olive oil, here, a truly gorgeous Meyer lemon olive oil from O Olive Oil.

So what is fresh mozzarella and how is it different? If you're new to fresh mozzarella, boy, are you in for a real treat! Mostly, we know mozzarella in the 'ripened' bricks of cheese wrapped in plastic from the dairy department at the grocery -- but for insalata caprese, only fresh mozzarella will do. Fresh mozzarella comes in balls about the size of an orange (and some times in smaller and even tiny balls great for small servings) and is packed in liquid to preserve the moisture.

In St. Louis, some supermarkets keep fresh mozzarella in big jars at the deli counter but you have to ask. Other times it's in small sealed plastic tubs, other times in those deli-type containers. Trader Joe's carries 'fresh' mozzarella but it's not very good though if your only source, go for it.

You can make fresh mozzarella at home though it involves plunging your hands into hot-hot-hot water, something I'm not anxious to do but sure wish my nearby cheese shop (the Wine & Cheese Place in Rock Hill) would, again. If you'd like to explore how to make homemade fresh mozzarella, this recipe and instructions for fresh mozzarella from cookbook author Beatrice Ojakangas seem good.)

2010 Update: For a more casual variation of Insalata Caprese, see Tossed Caprese Salad.

INSALATA CAPRESE

Hands-on time: 5 minutes
Time to table: 5 minutes
Serves 4

1 large tomato, sliced (here the gorgeous heirloom, the Brandywine)
1/4 pound ball of fresh mozzarella, cut in 4 slices
1 tablespoon good olive oil (here, the gorgeous olive oil from O Olive Oil)
Good salt (here, the lovely Maldon flakes)
Fresh basil, sliced thin

Arrange tomatoes and mozzarella on a platter or individual plates. Drizzle with olive oil, sprinkle with salt, top with basil. Devour!


A Veggie Venture - Printer Friendly Recipe Graphic


How to eat more vegetables? A Veggie Venture is the home of Veggie Evangelist Alanna Kellogg and the best source of free vegetable recipes with 700+ quick and easy favorite vegetable recipes, the Alphabet of Vegetables, Weight Watchers low-point recipes and microwave vegetable recipes.


reade more... Résuméabuiyad

Another Daring Weekend

This month's Daring Bakers challenge comes courtesy of baker extraordinaire, Peabody and of course, it wasn't an easy one.
After last month's gentle Bagel challenge, the Strawberry Mirror Cake sounds pretty fancy, right? A swiss roll sponge adding gentle support to a Barbie pink Strawberry Bavarian Cream, topped with the mirror element: a ruby clear jelly, flavoured with strawberry juice and a liberal dash of Kirsch.
I would never have dreamt of making this cake, imagining it to be horribly complex but, aside from being time-consuming and a bit fiddly, it was actually very simple.
Having a fear of gelatine after several nightmarish experiences with leaf gelatine, I have since found that the powdered stuff is the way to go. It might seem a little more old-fashioned than those charming little panes of gelatine glass but trust me, the powder will set anything to the thickness of a rubber tyre if you add enough of it.
This isn't a cake you would make for everyday occasions. It is quite expensive to make, utilising several punnets of fresh strawberries (and for some reason, fresh fruit is always cost-prohibitive over here) but I think it would be wonderful for a pink-loving girl's summer birthday party. It is visually stunning enough to receive plenty of oohs and ahhs. Flavourwise though, it was unsophisticated, reminding me slightly of Strawberry Angel Delight topped with Strawberry Jelly, the sponge reminscent of Frozen Swiss Roll cakes.
However, if you were to sharpen the mousse up with raspberry and blackberries, I think this cake could be suitable for a grown-up dinner party instead.
In spite of my disappointment with the final flavour though, the cake was a glowing success. Paul has taken it to work for the final taste test so only time will tell if it's merely my fussy tastebuds or if the cake really was bland. I feel particularly proud of myself for producing a cake with such a stunning mirror finish, and I would like to thank Peabody for choosing the Mirror Cake and for making me bake outside of the box (so to speak).
For those of you non-Daring Bakers who are tempted by this lovely looking cake and want a challenge, here's the recipe:
STRAWBERRY MIRROR CAKE - serves easily 8
Ingredients:
Cake and Soaking Syrup
3 eggs
3 egg yolks
¾ cup sugar
1 tsp vanilla extract
3 egg whites
1/8 tsp cream of tartar
2 TBSP sugar
2/3 cup sifted cake flour
½ cup water
1/3 cups sugar
2 TBSP kirsch or strawberry liqueur
Strawberry Bavarian Cream
2 ½ TBSP unflavored gelatin
1 ½ cups strained strawberry puree(1 ½ baskets)
5 egg yolks
2/3 cup sugar
1 ½ cups milk
1 TBSP lemon juice
several drops of red food coloring
1 ¾ cups whipping cream
Strawberry Mirror
1 tsp lemon juice
1 TBSP kirsch
1 TBSP water
1 TBSP unflavored gelatin
Few drops of red food coloring
Strawberry Juice
1 ½ pints of strawberries(18 oz)
¾ cup sugar
¾ cup water
METHOD:
1.Preheat oven to 450F. Butter and flour the sides of an 11-by-17 inch jelly roll pan(rimmed baking sheet). Line bottom of pan with a sheet of parchment paper cut to fit bottom pan exactly.
2.Beat eggs, egg yolks and ¾ cup sugar together in a medium bowl until thick and light. Beat in the vanilla.
3.In a separate bowl, beat the egg whites until foamy, ad cream of tartar and beat until whites begin to form peaks. Add the 2 TBSP sugar and beat until the whites hold stiff, glossy peaks(do not over beat).
4.Sift flour over the egg yolk mixture and fold in . Stir in one fourth of the whites. Then carefully fold in the remaining whites.
5.Spread batter evenly in pan. Bake until light brown and springy to touch(7 to 10 minutes). Cool in pan 5 minutes. Run a knife along edge to loosen. Invert cake tin to cut out 8 ¼ inch circles of cake. Wrap the cake layers, separated with waxed paper, and set aside. Cake may be frozen at this point.
6.To make soaking syrup: Combine water and the 1/3 cup sugar in saucepan; bring to a boil to dissolve sugar. Cool to room temperature; flavor with liqueur. Set aside or refrigerate in glass jar until ready to use.
7.To assemble cake: Brush sides of 10-inch springform pan lightly with flavorless salad oil or almond oil. Cut out a cardboard circle that is exactly the same size as the bottom inside of the pan; cover cardboard with aluminum foil and fit into bottom of pan. Center one layer of the cake bottom of pan. Brush the cake with some of the soaking syrup to just moisten(not drench) the cake; set aside.
8.Prepare Strawberry Bavarian Cream. Immediately pour about half of the Bavarian Cream over the first layer of cake in the pan. Set the next layer of cake on top of the cream. Pour remaining Bavarian Cream over cake and smooth top of the cream with spatula. Refrigerate until the cream sets(1 to 2 hours).
9.Prepare the Strawberry Mirror.
10.To serve: Wrap a hot towel around the outside of springform pan for a few minutes. Run a small sharp knife tip around the edge of the Strawberry Mirror to separate it form the sides of pan. Mirror will tear when sides are unlatched if it is stuck at ANY point. Slowly unlatch the pan and slide it off the cake. Slice cake in wedges and serve in upright slices.
Prep Work:
Strawberry Bavarian Cream
1.Sprinkle the gelatin over the strawberry puree in a small bowl and set aside until spongy.
2.Combine egg yolks and sugar in a bowl' beat until light. Bring milk to a boil in sauce pan. Pour hot milk into yolk mixture ans stir with a wooden spoon(it doesn't say so but I would temper the egg mixture first to be safe). Return this mixture to the saucepan and cook over medium heat, stirring constantly, until your finger leaves a clear trail in sauce when drawn across the back of the spoon.(Do not boil or mixture will curdle.) Immediately remove from heat and stir in softened gelatin mixture. Pour into a stainless steel bowl places over a bowl of ice water. Stir in lemon juice and a few drops of red food coloring. Cool over ice water, stirring occasionally, until mixture thickens to the consistency of softly whipped cream.
3.White gelatin mixture is cooling, whip the whipping cream until it holds soft peaks. When the gelatin mixture resembles softly whipped cream, fold the whipped cream into the gelatin mixture.
Strawberry Mirror:
1.Prepare strawberry juice.
2.Place lemon juice, kirsch, and water in a small bowl. Sprinkle gelatin over this mixture; set aside until spongy and soft.
3.Measure 1 ½ cups Strawberry juice into a small saucepan and bring to a simmer; pour over gelatin mixture and stir to dissolve gelatin. Tint to desired color with red food coloring. Place bowl over bowl of ice water and stir occasionally until the mixture is syrupy and just beings to thicken(do not let jell); remove from ice water.
4.When mixture is syrupy, pour a 1/16-inch layer over the top of cake. Refrigerate until set.
Strawberry Juice
Wash and hull strawberries; coarsely chop. Place strawberries in saucepan; crush to start juices flowing. Place over low heat; add sugar and water; simmer slowly 10 minutes. Pour juice and pulp through damp jelly bag or cheesecloth-lined colander and drain into a bowl for 15 minutes(Do not press down on fruit).
Adapted from Cakes and Pastries At The Academy by the California Culinary Academy 1993
reade more... Résuméabuiyad

Kitchen Parade Extra: Herbed Ricotta with Roasted Cherry Tomatoes ♥

From Kitchen Parade, Herbed Ricotta with Roasted Cherry TomatoessFrom this week's Kitchen Parade column, a great summer appetizer.

'Got milk? We all recognize the slogan from the dairy industry’s ads featuring celebrities with milk-mustached upper lips. But here’s a new version. “Got milk? Got ricotta.”'

Get the recipe for Herbed Ricotta with Roasted Cherry Tomatoes -- made with your very own homemade ricotta -- at Kitchen Parade.


SO WHAT IS KITCHEN PARADE, EXACTLY? Kitchen Parade is the food column that my Mom started writing for our family newspaper when I was a baby. Today it's published in my hometown newspapers in suburban St. Louis and features 'fresh seasonal recipes for every-day healthful eating and occasional indulgences'.

Where A Veggie Venture is 'pure food blog', full of experimentation and exploration, Kitchen Parade features recipes a modern cook can count on. All are thoroughly tested by a home cook in a home kitchen and many are family and reader favorites. All recipes feature easy-to-find ingredients, clear instructions and because I believe so strongly in informed food choices, nutrition analysis and Weight Watchers points. Want to know more? Explore Kitchen Parade, including Kitchen Parade's Recipe Box!

WHY CAN'T I COMMENT ON THIS PAGE? Because I hope that you'll click through to the actual column and comment there!

A Veggie Venture is home of the Veggie Evangelist Alanna Kellogg and vegetable inspiration from Asparagus to Zucchini. © Copyright 2007
reade more... Résuméabuiyad