How to roast fresh beets with minimum fuss and an abundance of earthy, sensual beet flavor. After many years of cooking beets one way or another, in my experience, this is the best way to cook fresh beets.
If you ask the Beet Queen (aka me, Alanna) how to roast beets, what oven temperature to use for roasting beets, even how long to roast beets, I'll tell you, "It depends." You see, I've tried so many ways of roasting beets, some simple, some a little complicated, some worth remembering, others not. It's taken five years of cooking beets to settle onto my favorite way to roast beets. This method takes the least fuss and every time, yields moist and earthy cooked beets.
Roasting beets is easy but it helps to arm yourself with a few shortcuts, tips and techniques I've collected over the years. And once you've roasted beets, there are soooo many quick salads and sides to choose from. Check out all the beet recipes, the ones that call for pre-cooked beets are marked like this
 . They don't call me the Beet Queen for nuthin'.
 WHAT YOU'LL NEED to ROAST BEETS
A cutting board
A large oven-safe pot with a cover
A sharp knife
A little oil
That's all!
STUMBLEUPON: For all who use the great discovery tool StumbleUpon, I'd love for this post to be 'stumbled'!
 Behold the beautiful beet! Such knobs of dark and mysterious beauty, we shall capture their hearts, just as they romance the tastebuds of all beet lovers. Behold the beautiful beet! Such knobs of dark and mysterious beauty, we shall capture their hearts, just as they romance the tastebuds of all beet lovers. Before getting started, turn the oven to 375F. |
 We're doing to deal with the beet bulbs and the beet greens separately. We're doing to deal with the beet bulbs and the beet greens separately. First, scrub-scrub-scrub the beet bulbs themselves. Clean them under running water, rubbing the skins with your fingers to brush off any stubborn grit, paying special attention to all the rough parts where the stems sprout out and to the "tail". But be gentle! Don't scrub the beets too hard, otherwise the barrier of the skin will weaken and if it does, liquid and flavor will leak out during roasting. While you're washing the bulbs. give the greens a quick rinse too. |
 Cut the greens off the bulbs, leaving about a half inch to an inch of stubby stems. Don't touch that tail either! Cut the greens off the bulbs, leaving about a half inch to an inch of stubby stems. Don't touch that tail either! Actually, it's not a 'tail' even if it does look like a mouse's tail. It's the "tap root" of the beet, the bit that reaches deep into the soil to gather up minerals and all the wonderful earthy flavor that we love about beets. Why leave a bit of stem on, why leave the tail / tap root alone? We don't want to risk cutting the beet's flesh, effectively 'wounding' the beet, letting liquid and flavor leak out during roasting. That's bad for the pan (one big sugary mess) and bad for the beet lover (dry and shriveled beets). NOT good. |
 Drop the beets into a large deep pot such as a Dutch oven, something with a lid, something that can go in the oven. Drop the beets into a large deep pot such as a Dutch oven, something with a lid, something that can go in the oven. I suppose if your pot is deep enough, you could do more than one layer. But one layer is all that will fit in my Dutch oven so that's all I've ever roasted. If you have an extra beet that won't fit, make yourself a Raw Beet Sandwich. Yum. Plus it's going to be awhile before the beet babies are roasted. Or maybe you've got way more beets than will fit? You are going to love-love-love the oh-so-gorgeous Greens 'n' All Beet Soup. |
 Ooops, sorry for the distractions. This is the Beet Queen talking, after all. Ooops, sorry for the distractions. This is the Beet Queen talking, after all. Pour a tiny bit of oil on each beet, about a teaspoon apiece. |
 Now get in there with your hands and rub that oil all over the skins. Now get in there with your hands and rub that oil all over the skins. |
 Cover! I mean it, cover the pot! Once I forgot the lid and these lovely little beets from the farmers market didn't cook during the first hour and had a really off taste when I covered them and roasted a second hour. It was a "save" that didn't work. Cover! I mean it, cover the pot! Once I forgot the lid and these lovely little beets from the farmers market didn't cook during the first hour and had a really off taste when I covered them and roasted a second hour. It was a "save" that didn't work. Put the beets into the oven for about an hour. (If the oven hasn't fully preheated, don't worry, just put the pot in the oven and set the timer for 60 minutes plus whatever number of minutes remain for the oven to come to the roasting temperature.) Timing is always iffy with beets, however, so please don't "count" on them for supper in exactly an hour because some times roasting beets takes longer than an hour. I haven't been able to figure out the difference, maybe it's the size of the beets, how fresh they are, how they've been stored, how dense the beets are, etc. But when someone asks me how long to roast beets, I will always say, "Roast beets for an hour, then check every 15 minutes or so until they're done." To promote even cooking, especially with large beets, some times I turn the beets after 20 and 40 minutes. |
 Now the greens -- if you've got any even tiny thought of throwing them away, banish the thought! This is going to be so easy! Now the greens -- if you've got any even tiny thought of throwing them away, banish the thought! This is going to be so easy! Ooops, no photo, but check the greens again by rubbing the a leaf or two with your fingers. If there's any feel of grit, head back to the sink and rinse the leaves again under running water, gently rubbing the leaves with your fingers to loosen the dirt. If the greens are really gritty, soak them in cool water for a few minutes, sloshing them around every so often. Rinse them under running water again, making sure to get right into all the crevices. Once the greens are grit-free, line them up at the junction of the stem and the leaf, then slice off the stems. If the stems are thick and crotchety looking, well, unless you're really frugal, toss 'em, they're just not worth it. But if they are thin and perfect like these, they cook quickly and add lots of fiber. They're good! |
 Check the leaves themselves. If any are bruised, as shown here, give them a toss. If any are tough or cracked, throw them away too. Check the leaves themselves. If any are bruised, as shown here, give them a toss. If any are tough or cracked, throw them away too. |
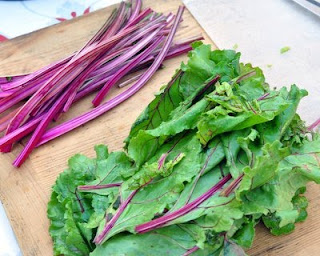 Keep the stems and the greens separate because they have different cooking times. Keep the stems and the greens separate because they have different cooking times. Now I'm going to introduce you to one of my best cooking secrets. Okay, I share all my best recipes, no secrets there, so let's call this my favorite technique for cooking greens, beet greens and other greens too. This is how to cook greens, quickly and easily, but hold them for a day to two to eat later! Greens are so tender and perishable, this lets you do a little "cooking" now but postpone the "eating" until later. Say hello to Greek Greens. Fresh greens need never go to waste again. |
 Back to those roasted beets! It's time to check to see if they're done or not. Back to those roasted beets! It's time to check to see if they're done or not. Insert a thin knife right into the center of the beet. If it goes in easily, the beets are done. If there's resistance, put the beets back into the oven for 15 minutes, then check again. I've had beets take as long as 2 hours to roast. Remember what I said about not counting on beets for supper at a specific time? This is why. Patience, let the beets cook until they are soft and fully roasted, all the way through. |
 ASIDE: And once the beets are cooked, oh my, here's a treat for hungry beet lovers, one I look forward to every time I roast beets. ASIDE: And once the beets are cooked, oh my, here's a treat for hungry beet lovers, one I look forward to every time I roast beets. Just skin and slice a hot-hot beet and dab with butter and if you like, a little good salt or a sprinkle of Spanish paprika. Ohhhhhhhh so good! Go ahead and eat one, I'll wait. Isn't that first beet just delicious? This "recipe" was given to me by a reader from Brunswick, Missouri. I'm so forever grateful, I call the recipe King Hill Farms Simple & Sublime Beets. |
 Once the beets are fully cooked, let them cool down until they're cool enough to handle. Once the beets are fully cooked, let them cool down until they're cool enough to handle. Word to the wise: It would be just fine to refrigerate the beets right now for eating later but the skins are slightly easier to remove when the beets are still warm. |
 Let's peel these beets! It's a little messy and your hands, yes, will stain. Call it a Beet Queen badge of honor. Let's peel these beets! It's a little messy and your hands, yes, will stain. Call it a Beet Queen badge of honor. First, slice off the stem end. |
 Rub the beet skins with your fingertips, they will slip right off! A knife can help with any resistant bits. Rub the beet skins with your fingertips, they will slip right off! A knife can help with any resistant bits. So that's all there is to it! You've roasted a big panful of beets and from now on, quick beet dishes are just a few minutes away because the cooking is already done. |
FAVORITE WAYS to ENJOY ROASTED BEETS
~ How to Make a Roasted Beet Salad ~
~ Beet Carpaccio ~
~ Harvard Beets ~
~ Red Onion Beets ~
~ Borscht Beets ~
~ Beets with Feta ~
~ Beet Pesto ~
~ more beet recipes ~
MORE WAYS to COOK BEETS
~ Microwave Beets ~
~ Summer Borscht ~
(Beets Cooked in Water on Stovetop)
~ Roasted Beet Supper Salad ~
(Beets Peeled Then Roasted)
~ Pan-Pickled Beets ~
("Pickled" in a Skillet)
~ How to Make a Roasted Beet Salad ~
~ Beet Carpaccio ~
~ Harvard Beets ~
~ Red Onion Beets ~
~ Borscht Beets ~
~ Beets with Feta ~
~ Beet Pesto ~
~ more beet recipes ~
MORE WAYS to COOK BEETS
~ Microwave Beets ~
~ Summer Borscht ~
(Beets Cooked in Water on Stovetop)
~ Roasted Beet Supper Salad ~
(Beets Peeled Then Roasted)
~ Pan-Pickled Beets ~
("Pickled" in a Skillet)
NEVER MISS A RECIPE! (OR A HANDY-DANDY CUTTING GUIDE LIKE THIS) For 'home delivery' of new recipes from A Veggie Venture, sign up here. Once you do, new recipes will be delivered, automatically, straight to your e-mail In Box.
© Copyright Kitchen Parade 2010