Pages

Insalata Caprese ♥ A Simple Summer Treat

Insalata Caprese, the summer classic, just slices of perfect tomato and fresh mozzarella
Slices of perfect summer tomatoes and fresh mozzarella, drizzled with good olive oil and scattered with fresh basil. Gorgeous!

When I gushed over the taste of the summer's first tomatoes last month, several commenters suggested 'insalata caprese' as a simple way to revel in perfectly ripe home-grown tomatoes. "I've done that", I thought but then wondered, "Have I?" No, not really.

You see, way back on Day 87 (yes, I really did count each day during A Veggie Venture's first year, when I cooked a vegetable in a new way every single day, note to self: how mad was that?) I sliced tomato and fresh mozzarella and then drizzled it with good vinegar -- very good! delicious, in fact -- but not insalata caprese, which is drizzled with good olive oil, here, a truly gorgeous Meyer lemon olive oil from O Olive Oil.

So what is fresh mozzarella and how is it different? If you're new to fresh mozzarella, boy, are you in for a real treat! Mostly, we know mozzarella in the 'ripened' bricks of cheese wrapped in plastic from the dairy department at the grocery -- but for insalata caprese, only fresh mozzarella will do. Fresh mozzarella comes in balls about the size of an orange (and some times in smaller and even tiny balls great for small servings) and is packed in liquid to preserve the moisture.

In St. Louis, some supermarkets keep fresh mozzarella in big jars at the deli counter but you have to ask. Other times it's in small sealed plastic tubs, other times in those deli-type containers. Trader Joe's carries 'fresh' mozzarella but it's not very good though if your only source, go for it.

You can make fresh mozzarella at home though it involves plunging your hands into hot-hot-hot water, something I'm not anxious to do but sure wish my nearby cheese shop (the Wine & Cheese Place in Rock Hill) would, again. If you'd like to explore how to make homemade fresh mozzarella, this recipe and instructions for fresh mozzarella from cookbook author Beatrice Ojakangas seem good.)

2010 Update: For a more casual variation of Insalata Caprese, see Tossed Caprese Salad.

INSALATA CAPRESE

Hands-on time: 5 minutes
Time to table: 5 minutes
Serves 4

1 large tomato, sliced (here the gorgeous heirloom, the Brandywine)
1/4 pound ball of fresh mozzarella, cut in 4 slices
1 tablespoon good olive oil (here, the gorgeous olive oil from O Olive Oil)
Good salt (here, the lovely Maldon flakes)
Fresh basil, sliced thin

Arrange tomatoes and mozzarella on a platter or individual plates. Drizzle with olive oil, sprinkle with salt, top with basil. Devour!


A Veggie Venture - Printer Friendly Recipe Graphic


How to eat more vegetables? A Veggie Venture is the home of Veggie Evangelist Alanna Kellogg and the best source of free vegetable recipes with 700+ quick and easy favorite vegetable recipes, the Alphabet of Vegetables, Weight Watchers low-point recipes and microwave vegetable recipes.


reade more... Résuméabuiyad

Another Daring Weekend

This month's Daring Bakers challenge comes courtesy of baker extraordinaire, Peabody and of course, it wasn't an easy one.
After last month's gentle Bagel challenge, the Strawberry Mirror Cake sounds pretty fancy, right? A swiss roll sponge adding gentle support to a Barbie pink Strawberry Bavarian Cream, topped with the mirror element: a ruby clear jelly, flavoured with strawberry juice and a liberal dash of Kirsch.
I would never have dreamt of making this cake, imagining it to be horribly complex but, aside from being time-consuming and a bit fiddly, it was actually very simple.
Having a fear of gelatine after several nightmarish experiences with leaf gelatine, I have since found that the powdered stuff is the way to go. It might seem a little more old-fashioned than those charming little panes of gelatine glass but trust me, the powder will set anything to the thickness of a rubber tyre if you add enough of it.
This isn't a cake you would make for everyday occasions. It is quite expensive to make, utilising several punnets of fresh strawberries (and for some reason, fresh fruit is always cost-prohibitive over here) but I think it would be wonderful for a pink-loving girl's summer birthday party. It is visually stunning enough to receive plenty of oohs and ahhs. Flavourwise though, it was unsophisticated, reminding me slightly of Strawberry Angel Delight topped with Strawberry Jelly, the sponge reminscent of Frozen Swiss Roll cakes.
However, if you were to sharpen the mousse up with raspberry and blackberries, I think this cake could be suitable for a grown-up dinner party instead.
In spite of my disappointment with the final flavour though, the cake was a glowing success. Paul has taken it to work for the final taste test so only time will tell if it's merely my fussy tastebuds or if the cake really was bland. I feel particularly proud of myself for producing a cake with such a stunning mirror finish, and I would like to thank Peabody for choosing the Mirror Cake and for making me bake outside of the box (so to speak).
For those of you non-Daring Bakers who are tempted by this lovely looking cake and want a challenge, here's the recipe:
STRAWBERRY MIRROR CAKE - serves easily 8
Ingredients:
Cake and Soaking Syrup
3 eggs
3 egg yolks
¾ cup sugar
1 tsp vanilla extract
3 egg whites
1/8 tsp cream of tartar
2 TBSP sugar
2/3 cup sifted cake flour
½ cup water
1/3 cups sugar
2 TBSP kirsch or strawberry liqueur
Strawberry Bavarian Cream
2 ½ TBSP unflavored gelatin
1 ½ cups strained strawberry puree(1 ½ baskets)
5 egg yolks
2/3 cup sugar
1 ½ cups milk
1 TBSP lemon juice
several drops of red food coloring
1 ¾ cups whipping cream
Strawberry Mirror
1 tsp lemon juice
1 TBSP kirsch
1 TBSP water
1 TBSP unflavored gelatin
Few drops of red food coloring
Strawberry Juice
1 ½ pints of strawberries(18 oz)
¾ cup sugar
¾ cup water
METHOD:
1.Preheat oven to 450F. Butter and flour the sides of an 11-by-17 inch jelly roll pan(rimmed baking sheet). Line bottom of pan with a sheet of parchment paper cut to fit bottom pan exactly.
2.Beat eggs, egg yolks and ¾ cup sugar together in a medium bowl until thick and light. Beat in the vanilla.
3.In a separate bowl, beat the egg whites until foamy, ad cream of tartar and beat until whites begin to form peaks. Add the 2 TBSP sugar and beat until the whites hold stiff, glossy peaks(do not over beat).
4.Sift flour over the egg yolk mixture and fold in . Stir in one fourth of the whites. Then carefully fold in the remaining whites.
5.Spread batter evenly in pan. Bake until light brown and springy to touch(7 to 10 minutes). Cool in pan 5 minutes. Run a knife along edge to loosen. Invert cake tin to cut out 8 ¼ inch circles of cake. Wrap the cake layers, separated with waxed paper, and set aside. Cake may be frozen at this point.
6.To make soaking syrup: Combine water and the 1/3 cup sugar in saucepan; bring to a boil to dissolve sugar. Cool to room temperature; flavor with liqueur. Set aside or refrigerate in glass jar until ready to use.
7.To assemble cake: Brush sides of 10-inch springform pan lightly with flavorless salad oil or almond oil. Cut out a cardboard circle that is exactly the same size as the bottom inside of the pan; cover cardboard with aluminum foil and fit into bottom of pan. Center one layer of the cake bottom of pan. Brush the cake with some of the soaking syrup to just moisten(not drench) the cake; set aside.
8.Prepare Strawberry Bavarian Cream. Immediately pour about half of the Bavarian Cream over the first layer of cake in the pan. Set the next layer of cake on top of the cream. Pour remaining Bavarian Cream over cake and smooth top of the cream with spatula. Refrigerate until the cream sets(1 to 2 hours).
9.Prepare the Strawberry Mirror.
10.To serve: Wrap a hot towel around the outside of springform pan for a few minutes. Run a small sharp knife tip around the edge of the Strawberry Mirror to separate it form the sides of pan. Mirror will tear when sides are unlatched if it is stuck at ANY point. Slowly unlatch the pan and slide it off the cake. Slice cake in wedges and serve in upright slices.
Prep Work:
Strawberry Bavarian Cream
1.Sprinkle the gelatin over the strawberry puree in a small bowl and set aside until spongy.
2.Combine egg yolks and sugar in a bowl' beat until light. Bring milk to a boil in sauce pan. Pour hot milk into yolk mixture ans stir with a wooden spoon(it doesn't say so but I would temper the egg mixture first to be safe). Return this mixture to the saucepan and cook over medium heat, stirring constantly, until your finger leaves a clear trail in sauce when drawn across the back of the spoon.(Do not boil or mixture will curdle.) Immediately remove from heat and stir in softened gelatin mixture. Pour into a stainless steel bowl places over a bowl of ice water. Stir in lemon juice and a few drops of red food coloring. Cool over ice water, stirring occasionally, until mixture thickens to the consistency of softly whipped cream.
3.White gelatin mixture is cooling, whip the whipping cream until it holds soft peaks. When the gelatin mixture resembles softly whipped cream, fold the whipped cream into the gelatin mixture.
Strawberry Mirror:
1.Prepare strawberry juice.
2.Place lemon juice, kirsch, and water in a small bowl. Sprinkle gelatin over this mixture; set aside until spongy and soft.
3.Measure 1 ½ cups Strawberry juice into a small saucepan and bring to a simmer; pour over gelatin mixture and stir to dissolve gelatin. Tint to desired color with red food coloring. Place bowl over bowl of ice water and stir occasionally until the mixture is syrupy and just beings to thicken(do not let jell); remove from ice water.
4.When mixture is syrupy, pour a 1/16-inch layer over the top of cake. Refrigerate until set.
Strawberry Juice
Wash and hull strawberries; coarsely chop. Place strawberries in saucepan; crush to start juices flowing. Place over low heat; add sugar and water; simmer slowly 10 minutes. Pour juice and pulp through damp jelly bag or cheesecloth-lined colander and drain into a bowl for 15 minutes(Do not press down on fruit).
Adapted from Cakes and Pastries At The Academy by the California Culinary Academy 1993
reade more... Résuméabuiyad

Kitchen Parade Extra: Herbed Ricotta with Roasted Cherry Tomatoes ♥

From Kitchen Parade, Herbed Ricotta with Roasted Cherry TomatoessFrom this week's Kitchen Parade column, a great summer appetizer.

'Got milk? We all recognize the slogan from the dairy industry’s ads featuring celebrities with milk-mustached upper lips. But here’s a new version. “Got milk? Got ricotta.”'

Get the recipe for Herbed Ricotta with Roasted Cherry Tomatoes -- made with your very own homemade ricotta -- at Kitchen Parade.


SO WHAT IS KITCHEN PARADE, EXACTLY? Kitchen Parade is the food column that my Mom started writing for our family newspaper when I was a baby. Today it's published in my hometown newspapers in suburban St. Louis and features 'fresh seasonal recipes for every-day healthful eating and occasional indulgences'.

Where A Veggie Venture is 'pure food blog', full of experimentation and exploration, Kitchen Parade features recipes a modern cook can count on. All are thoroughly tested by a home cook in a home kitchen and many are family and reader favorites. All recipes feature easy-to-find ingredients, clear instructions and because I believe so strongly in informed food choices, nutrition analysis and Weight Watchers points. Want to know more? Explore Kitchen Parade, including Kitchen Parade's Recipe Box!

WHY CAN'T I COMMENT ON THIS PAGE? Because I hope that you'll click through to the actual column and comment there!

A Veggie Venture is home of the Veggie Evangelist Alanna Kellogg and vegetable inspiration from Asparagus to Zucchini. © Copyright 2007
reade more... Résuméabuiyad

Romano Beans in Butter-Braised Garlic ♥

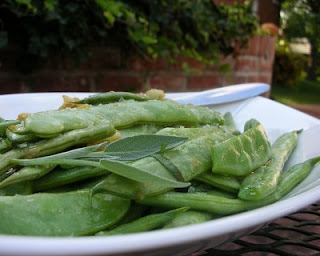
Just look at that caramelized garlic!Who knew that garlic could turn so sweet? The garlic cooks on a low flame in butter for nearly 45 minutes, seemingly doing nothing for the longest time, then quite quickly turning a sizzly golden color, all the while filling the air with gorgeous garlic aroma, then transforming into something I'm tempted to call 'garlic candy', sweet and yet still garlicky, not crunchy, the texture of, say, licorice. Garlic Magic!!

The beans are the flattish romano beans that I fell for last year -- ha! romano beans must really scream for garlic, check out Garlicky Romano Beans, especially if you limit saturated fat -- but any fresh green bean will do, I think.

NUTRITION NOTES The full 3 tablespoons of butter provides needed volume to braise the garlic. But it's also enough to 'dress' three or even four pounds of beans. For just one pound, it pools unappetizingly in the serving dish. Next time I'll set aside a couple of tablespoons of the braising butter for, say, a mean salad dressing, before dressing the beans.


OFF TO CHICAGO Tomorrow I'm off to attend Blogher '07, where I'm happy to meet so many food bloggers in person for the first time ('oh! you look nothing like the picture on your blog!' and 'you look so different than you sound on the phone'!). My primary question during four days of motivational speeches, geeky technology stuff (and no doubt, ooohing and aaaahing over smashing shoes) is to figure out why in the world anyone would blog about things other than food. Ideas? Oh! And food bloggers who aren't in Chicago? When your pots (get it?!) burn, you'll know ... we're laughing over your last kitchen mishap or nodding in admiration over that last wonderful cake. You'll be missed, one and all! TAG:blogme2007


FROM THE ARCHIVES See the Recipe Box for all the green bean recipes.

A YEAR AGO THIS WEEK Refrigerator Pickles! From my Kitchen Parade column, a pair of refrigerator pickle recipes, one with cucumbers and peppers, another with Brussels sprouts

TWO YEARS AGO Eggplant Sandwiches with Cilantro Hummus

ROMANO BEANS in BUTTER-BRAISED GARLIC

Hands-on time: 20 minutes
Time to table: 40 minutes
Serves 4

1 big pot of heavily salted water (this means 2 quarts of water and 1 tablespoon of table salt for a pound of beans)

3 tablespoons unsalted butter
4 or 5 or more large cloves of garlic, peeled and pressed flat with the blade of a knife (I used my own homegrown garlic)

1 pound green beans (or any snap bean), ends snapped
1 tablespoon fresh sage [the inspiring recipe says 1 teaspoon or a pinch of dried]
[1 tablespoon fresh parsley, suggests the inspiring recipe, I skipped this]
Good salt to taste (I used large flakes of Maldon salt for real bursts of saltiness)

Bring the water to a boil.

Meanwhile, in a skillet eventually large enough to hold the beans, too, melt the butter on the lowest flame. Add the garlic when it's prepped, COVER and let cook, watching the flame so the butter doesn't burn, letting the garlic warm slowly until it begins to sizzle and turn golden, watching very carefully after that. At some point along the way, chop or mash the garlic into small bits and return to the skillet to continue.

While garlic braises, cook the beans in the water til the desired doneness (I think just past tender-crisp is right for this, you want the butter to be able to soak into the flesh a bit when the time comes) is reached. Drain in a colander.

When the garlic is done, if you like, reserve a couple of tablespoons of the butter for another use, then stir in the beans and rewarm. Transfer to a serving dish, sprinkle with good salt and serve.


PRINT JUST A RECIPE! Now you can print a recipe without wasting ink and paper on the header and sidebar. Here's how.

NEVER MISS A RECIPE! For 'home delivery' of new recipes from A Veggie Venture, sign up here. Once you do, new recipes will be delivered, automatically, straight to your e-mail In Box.

TAGS


How to eat more vegetables? A Veggie Venture is the home of Veggie Evangelist Alanna Kellogg and the best source of free vegetable recipes with 700+ quick and easy favorite vegetable recipes, the Alphabet of Vegetables, Weight Watchers low-point recipes and microwave vegetable recipes.

reade more... Résuméabuiyad

Grilled Eggplant with Balsamic Honey Syrup ♥

Simple grilled eggplant topped with fresh thyme and drizzled with a balsamic & honey syrupSlowly but surely, I'm finally grooving with the grill, attacking the easy stuff first. Grilled corn in the husk. Now grilled eggplant. How're my grill marks, not bad, eh?!

It was late when I turned on the grill, then looked for a recipe for eggplant I picked up over the weekend. The thing I love most about Everyday Vegetables by Jack Bishop (thanks again, Kalyn!) is that reliably, at the very last minute, it's (1) easy to find a recipe that (2) appeals with (3) the ingredients are already on hand and (4) cooks in a flash. Did I mention delicious, too? That goes without saying ... plus I'm pleased to add to a small but growing collection of grilled vegetable recipes.

This, for sure, fits my definition of real food, the favorite recipes and techniques and sources you turn to again and again. If there's anything that I strive to share with A Veggie Venture and Kitchen Parade, my published food column, it's real food.

NUTRITION NOTES It took a full two tablespoons of oil and garlic to brush the eggplant. Are there tricks to using less oil when grilling vegetables? I'd appreciate your tips.

TOOL TIP While I've long discarded all the silly silicone baking gear that was so much the rage a couple of years ago, I do love my silicone basting brush.


FROM THE ARCHIVES For more great every-day vegetable recipes from Jack Bishop, just type 'Bishop' in the Search Box at the top of the page.

See the Recipe Box for all the eggplant recipes but I especially recommend my recipe for ratatouille (isn't it cool that kids and grown-ups everywhere are learning that ratatouille is a recipe as well as a rat?!!) plus the Eggplant, Tomato & Mozzarella Sandwiches and the Thai Roasted-Eggplant Salad.

A YEAR AGO THIS WEEK King Hill Farms Simple & Sublime Beets ... "But this "recipe" ~ if you can call something so supremely simple such ~ has changed my beet-cooking habits forever."

TWO YEARS AGO I made Holy Slaw! for the first time. It was so good, in 2006 it appeared in a Kitchen Parade column.

GRILLED EGGPLANT with BALSAMIC HONEY SYRUP

Hands-on time: 15 minutes
Time to table: 25 minutes
Serves 4

1 pound eggplant (I used three of the thinner Japanese eggplant, each yielded three slices)

2 tablespoons good olive oil
2 - 3 cloves fresh garlic, minced (I used home-grown 'wet' garlic that yielded more garlic juice than flesh so two cloves was plenty)
Salt & pepper

SYRUP
1/4 cup balsamic vinegar
1 tablespoon honey

Fresh thyme (or other fresh herbs)

Heat grill. (If you're an experienced griller, you know how to do this. Me, I'm new, I set the gas grill on medium and let it heat up while I continue the prep. It's plenty hot by the time the eggplant is ready.)

Trim the eggplant, then slice lengthwise in half-inch thick strips. In a small bowl, mix the olive oil and garlic. Brush the cut sides of the eggplant with oil/garlic mixture, then sprinkle with salt and pepper. Place on the grill for about 8 minutes, turning halfway through.

While eggplant grills, mix balsamic vinegar and honey in a small pan and bring to a boil. Let cook down til quite thick.

Layer the grilled eggplant on a platter, drizzle with the syrup. Sprinkle with fresh thyme.


PRINT JUST A RECIPE! Now you can print a recipe without wasting ink and paper on the header and sidebar. Here's how.

NEVER MISS A RECIPE! For 'home delivery' of new recipes from A Veggie Venture, sign up here. Once you do, new recipes will be delivered, automatically, straight to your e-mail In Box.

TAGS


How to eat more vegetables? A Veggie Venture is the home of Veggie Evangelist Alanna Kellogg and the best source of free vegetable recipes with 700+ quick and easy favorite vegetable recipes, the Alphabet of Vegetables, Weight Watchers low-point recipes and microwave vegetable recipes.
reade more... Résuméabuiyad

Kitchen Parade Extra: Sengalese Soup ♥

Sengalese Soup, served cold, sweet with honey, corn and shrimpFrom a 2003 Kitchen Parade column, published today online for the first time:

"Sengalese Soup fits busy lives. It makes up in minutes and keeps in the frig for several days ready to serve warm with bread on a chilly evening or cold with a crunchy salad some steamy summer night."

Sound like a recipe for your life? Get the recipe for Sengalese Soup at Kitchen Parade.

THE HEART OF THE MATTER Lucullian Delights is collecting heart-healthy recipes, this month featuring "waterlife" -- made with shrimp, low-fat milk and just-slightly sweetened with natural honey and corn, Sengalese Soup is my proud entry!


SO WHAT IS KITCHEN PARADE, EXACTLY? Kitchen Parade is the food column that my Mom started writing for our family newspaper when I was a baby. Today it's published in my hometown newspapers in suburban St. Louis and features 'fresh seasonal recipes for every-day healthful eating and occasional indulgences'.

Where A Veggie Venture is 'pure food blog', full of experimentation and exploration, Kitchen Parade features recipes a modern cook can count on. All are thoroughly tested by a home cook in a home kitchen and many are family and reader favorites. All recipes feature easy-to-find ingredients, clear instructions and because I believe so strongly in informed food choices, nutrition analysis and Weight Watchers points. Want to know more? Explore Kitchen Parade, including Kitchen Parade's Recipe Box!

WHY CAN'T I COMMENT ON THIS PAGE? Because I hope that you'll click through to the actual column and comment there!

A Veggie Venture is home of the Veggie Evangelist Alanna Kellogg and vegetable inspiration from Asparagus to Zucchini. © Copyright 2007
reade more... Résuméabuiyad

Braised Shanghai Bok Choy

Baby Shanhai bok choy, braised in coconut milk and tumericYes, I'm on a bok choy kick, it happens! (See yesterday's soy-glazed baby bok choy which includes photos of baby bok choy and baby Shanghai bok choy.)

But five minutes of prep? you can't beat that!

This is a super-easy way to cook the 'real bok choy', which can be somewhat fibrous. This means it is often stir-fried, where small pieces and high, fast heat break down the fibers.

Instead, here, the braising technique uses liquid (here, a mix of coconut milk and water colored and flavored with turmeric) and time (a good 30 minutes, unattended except to monitor the temperature) to soften the stalks for consumption. Don't expect the coconut flavor to permeate the bok choy, however -- at least this didn't, perhaps because I used a low-fat version?

Anyway, this is good enough, a useful 'basic' recipe that really lets the bok choy itself shine through.


FROM THE ARCHIVES See the Recipe Box for a growing collection of bok choy recipes.

2006 | Fattoush, the Lebanese salad, the third time's the charm!

BRAISED SHANGHAI BOK CHOY


Hands-on time: 5 minutes
Time to table: 35 minutes
Serves 4

1 pound Shanghai or other bok choy, baby versions if possible
1 tablespoon olive oil
1 tablespoon turmeric
1/2 tablespoon kosher salt (it seems like a lot but it was needed, plus it's really being used to salt the braising liquid, not what will be eaten, the bok choy)
1 cup coconut milk (I used low fat)
1/2 cup water
Lime wedges

Trim the bok choy, then cut into quarters vertically. Let drain.

In a large skillet with a cover, heat the oil til shimmery. Add the turmeric and salt and stir a minute. Add a few drops of liquid, stir til turmeric and salt become smooth and un-lumpy enough to add more liquid. Pack in the bok choy, cut sides down. Cover with coconut milk and water and bring to a slow boil. Cover and let cook for about 15 minutes, checking occasionally to make sure the slow boil is being maintained, also to press the bok choy into the liquid to submerge if needed. If the bok choy isn't fully submerged, turn over after 15 minutes. Cook another 15 minutes. Remove bok choy from liquid and serve with lime wedges.


PRINT JUST A RECIPE! Now you can print a recipe without wasting ink and paper on the header and sidebar. Here's how.

NEVER MISS A RECIPE! For 'home delivery' of new recipes from A Veggie Venture, sign up here. Once you do, new recipes will be delivered, automatically, straight to your e-mail In Box.

TAGS


How to eat more vegetables? A Veggie Venture is the home of Veggie Evangelist Alanna Kellogg and the best source of free vegetable recipes with 700+ quick and easy favorite vegetable recipes, the Alphabet of Vegetables, Weight Watchers low-point recipes and microwave vegetable recipes.

reade more... Résuméabuiyad

Soy-Glazed Baby Bok Choy ♥

Finally, baby bok choy
An introduction to two kinds of bok choy, including regular bok choy and Shanghai bok choy and their baby bok choy variations.

Last month, I cooked boy choy for the first time - at least I thought so. Turns out, that bok choy was actually Chinese cabbage, a variant for sure but also decidedly different, more like Napa cabbage or even romaine lettuce. So when both baby bok choy and baby Shanghai bok choy showed up in the produce section at my neighborhood international market, I decided to tackle bok choy, for real this time.

And I love the concept of this recipe, just skillet-browned bok choy which finishes cooking in a soy-vinegar glaze. It's good -- very good, even -- but the soy overpowers the flavor of the bok choy itself. So this recipe is perhaps suited for someone who loves bok choy and is looking for a new way to cook it, versus a neophyte like myself who's getting acquainted for the first time. (Or you could just use about a tiny splash of soy sauce.)
Keep Reading ->>>
reade more... Résuméabuiyad

Things in Batter

For anyone who has tried to fry things encased in batter and failed, it can be quite daunting. For one thing, there’s all that hot, bubbling fat. Up until a couple of years ago, I wouldn’t even stand within a 10 metre radius of boiling fat, lest it should irrationally spew itself all over my delicate skin.
Of course, whilst fat does spit a little, notably when you drop things in it, if you’re careful and sensible, there should be no house fires, no third degree burns and certainly no horrible fried food.
And, unlike buying from the local chippy, you can control what goes in your batter, how long you cook it for and the cleanliness of the oil.
We all know that fried food is almost as bad for you as dating an unrehabilitated serial killer but damn! it does taste good. There is nothing in the world so good as biting through crisp batter (drained thoroughly and not soggy) into white, flaky, creamy fish. And the best batter of all? Beer Batter.
Beer Batter is like the Rolls Royce of the batter kingdom. Not light enough to coat delicately sliced vegetables tempura style, but not stodgy enough (and too expensive) for chip shops. It coats fish, onion rings, mushrooms and probably Mars Bars, beautifully. There is no pappy underbelly and it provides a wonderful coat of armour for whatever you choose to dip in it, protecting your food from the intense heat, ensuring that it remains piping hot and steamy, rather than dried out and yukky.
And once you start using batter, you may never stop finding things to try. We restrained ourselves at mushrooms but we gave serious consideration to bananas and then various chocolate bars. Thankfully, we didn’t have many lying around. We had planned on serving our battered fish in the traditional style, which is to say, with chips. However, the potatoes can fry up a little too sweet at this time of the year so we parboiled some new potatoes then fried them up. Paul made a fourth attempt at making some mayonnaise which was partially successful and we served the whole thing on a bed of bitter leaves.
Another consideration would be Cider Batter, a perfect medieval coating for perhaps Elderflower blooms or Courgette Flowers or slices of Apples.
Finally, there’s the matter of whose going to drink the leftover beer…
BEER BATTERED HADDOCK (or cod) serves 2
Ingredients:
2 x 150g Haddock or Cod, skinless, cut at the thick end of the fillet
150g Self-Raising Flour
100ml Lager, chilled
Salt and Pepper
Oil for Deep Frying
METHOD:
Preheat your frying oil, either in a deep fat fryer or a large saucepan to about 160c. You want the fish to fry gently not ferociously in the fat.
In a large bowl, whisk together the flour, some seasoning and the beer. It should be the texture of thick double cream to ensure a good coating. Add more beer if necessary, more flour if too thin.
Season the fish on both sides, then lightly dust with flour. This will help the batter adhere to the fish.
You may need to fry the fish in batches so dip one piece at a time, making sure it is completely coated before gently plunging into the hot oil. It will fizzle as the batter starts to bubble up and then gradually turn a beautiful golden brown.
If you are cooking in a saucepan, you may need to turn the fish over using tongs as it tends to bob up to the surface.
Fry the fish for between 5-6 minutes.
Drain on kitchen paper and serve with the potato based dish of your choice, preferably chips.
Enjoy!
reade more... Résuméabuiyad

Grilled Sweet Corn with Spiced Lime Butter ♥

Corn grilled, right in the huskOh so easy! Oh so tasty! Oh so perfect for an all-grill meal! (And so nice to add to a small but growing collection of grilled vegetable recipes!)

First soak the corn, still in its husk, in water for a half hour. Leave the silk intact. You don't want to break the husk's "seal", plus the silk will peel away easily once the corn is grilled. (We tried both ways, just to see.) Then grill the corn right in the husks. Peel, drizzle with the spiced lime butter and ... dig in!

Delicious!

NUTRITION NOTES This is a definite indulgence, for a vegetable. But if you've got lovely picked-this-morning sweet corn, it's worth it.


FROM THE ARCHIVES See the Recipe Box for all the recipes for sweet corn. If you like to cook vegetables in foil on the grill, this is a favorite from my cousin Diane, barbecue vegetables oriental.

A YEAR AGO THIS WEEK Perfect Rhubarb Pie ... "three perfect rhubarb pies in all of two weeks. The first pie, we groaned. The second pie, we ate in silence. ..."

TWO YEARS AGO Green Beans with Honey Mustard Glaze ... "The trick to these beans ... is cooking them in what seems like a whole lotta water in a whole lotta salt. ... try the beans. They're amazing."

GRILLED CORN with SPICED LIME BUTTER

Hands-on time: 10 minutes
Time to table: 60 minutes
Serves 4

4 ears corn, still in husks, washed well

SPICED LIME BUTTER
4 tablespoons butter, melted
Zest of a lime
Juice of half a lime (about 1 tablespoon)
1 teaspoon cinnamon
1 teaspoon chili powder
Fresh chive

Soak the corn for 30 minutes before grilling. Grill over moderately high heat, turning often, til husks are charred all over. Remove husks and silk.

Stir together the butter ingredients. Pour over husked ears. Serve and enjoy!


HOW MANY CALORIES, CARBS & WEIGHT WATCHERS POINTS IN CORN
Nutrition Information Per 1/4 pound of raw corn: Per Serving: 98 Cal (11% from Fat, 13% from Protein, 76% from Carb); 4 g Protein; 1 g Tot Fat; 0 g Sat Fat; 0 g Mono Fat; 22 g Carb; 3 g Fiber; 4 g Sugar; 2 mg Calcium; 1 mg Iron; 17 mg Sodium; 0 mg Cholesterol; Weight Watchers 1 point

Nutrition Information Per ear of raw corn: Per Serving: 31 Cal (11% from Fat, 13% from Protein, 76% from Carb); 1 g Protein; 0 g Tot Fat; 0 g Sat Fat; 0 g Mono Fat; 7 g Carb; 1 g Fiber; NetCarb6; 1 g Sugar; 1 mg Calcium; 0 mg Iron; 5 mg Sodium; 0 mg Cholesterol; Weight Watchers 0 points


PRINT JUST A RECIPE! Now you can print a recipe without wasting ink and paper on the header and sidebar. Here's how.

NEVER MISS A RECIPE! For 'home delivery' of new recipes from A Veggie Venture, sign up here. Once you do, new recipes will be delivered, automatically, straight to your e-mail In Box.

TAGS


How to eat more vegetables? A Veggie Venture is the home of Veggie Evangelist Alanna Kellogg and the best source of free vegetable recipes with 700+ quick and easy favorite vegetable recipes, the Alphabet of Vegetables, Weight Watchers low-point recipes and microwave vegetable recipes.
reade more... Résuméabuiyad

Microwave Beets ♥

White beets cooked in the microwave
What a huge time-saver. If you love beets, you'll want to learn how easy it is to
cook beets in the microwave!

Two lessons for the 'price' of one today.
  1. Yes, the wily world of vegetables includes creamy white beets in addition to beet-red, pale pink and golden beets.
  2. Yes, beets can be cooked in the microwave!
#1 is a mere novelty but #2 is decidedly useful since cooking beets in the oven takes 60 - 90 minutes.

But in the microwave, cooking beets takes just 20 - 30 minutes, completely unattended except for turning. What a time-saver, what an energy-saver. (Does that, um, make these white beets, ummmm, 'green'?)

These beets were delicious, sliced hot from the microwave and topped with a pinprick of butter and a few fresh chives. I may never roast beets in the oven again.

And the technique is especially convenient when cooking for one or two. Need to cook just one beet or two beets? No problem.
Keep Reading ->>>
reade more... Résuméabuiyad

An Italian Dessert

Tiramisu means "pick me up" in Italian and if ever a dessert comprising of booze and coffee soaked ladyfingers, layered with mascarpone cream and dusted with cocoa powder could induce a feeling of being "picked up", it would be this one.
Yet another one of those once-popular restaurant dishes from the 70s and 80s, Tiramisu was relegated to "plastic pot sealed with foil lid and placed on the supermarket shelf" status, which happens to be where I first discovered this Italian delight. Although several years past its halcyon restaurant days, the Tiramisu deserves to be given another chance. It is surprisingly simple to make and never fails to please coffee or trifle lovers.
Like that other Italian classic dessert, Zuppa Inglese, Tiramisu is like a hassle-free trifle with its sponge fingers and eggy custard-like sauce. Unlike trifle though, it eschews the fruit element in favour of caffeine rich ingredients. The only thing that you need to prepare in advance is some espresso, the rest of the dish takes no longer than 15 minutes. Of course, the waiting comes with the refrigeration of the Tiramisu and it is crucial, not only to set the raw custard but to improve the flavours, that it sits in the fridge for at least 12 hours.
The traditional recipe might use Zabaglione between the sponge layers but this simpler method is just as delicious. The alcohol combined with the coffee can also be altered to suit what you have available. Coffee liqueur is again traditional, but I used Crème de Cacao (a remnant from the days when I used to make cocktails - Maraschino Liqueur anyone?) instead. You could use dark rum, or hazelnut liqueur, maybe even brandy. One of the characteristics about the Tiramisu is the strong coffee and alcohol flavouring punctuating the soft, billowy cream - not a dessert for children!
TIRAMISU - serves 4-6
Ingredients:
12 Savoiardi Biscuits or Ladyfingers
2 Eggs, separated
250g Mascarpone
3 Dessertspoons Vanilla Sugar to taste
125ml Freshly brewed but cold Espresso Coffee
125ml Coffee Flavoured Liqueur (or alcohol of your choice - not a cream based drink though)
Cocoa Powder for dusting
METHOD:
In a large, clean, grease-free bowl, whisk the egg whites until very stiff.
In another bowl, whisk the mascarpone cheese with the egg yolks and sugar until well combined.
Fold in the egg whites.
Mix together the alcohol and coffee in a shallow dish.
You are now ready to start assembling the Tiramisu.
Spoon a third of the Mascarpone mixture into your dish.
First dipping them one at a time in the coffee/alcohol mixture, turning them quickly so that they don't disintegrate, layer six of the Savoiardi biscuits on top of the cream. Top with another layer of cream, then the remainder of the sponge fingers. Spoon over the final blanket of the creamy sauce, then dust generously with cocoa so that the cream is completely obscured.
Cover gently and refrigerate for at least 12 hours.
To serve, remove from the fridge, uncover and dust with another layer of cocoa and some shaved chocolate if desired.
Enjoy!
reade more... Résuméabuiyad

Kitchen Parade Extra: Ratatouille Omelettes ♥

Ratatouille: a food hit worthy of a hit movieFrom this week's Kitchen Parade column:

"Last week I chose my words carefully with a 13-year old. “Do you like rat-a-too-ee?” Not unexpectedly, he was certain I meant this summer’s Disney hit movie and flashed a grin."

How do you nearly put tears in the eyes of a 13-year old? Read the rest of this week's column.


So what about the first foodie movie of the summer? (Still to come are No Reservations and another whose preview I saw before Ratoutille but looks as immemorable as its name, which, right, I can't remember.) Great great fun, for sure!

And for a couple of weeks my 2002 recipe for ratatouille (only column #2, that's how much I love this stuff) has been considerable attention. And it should! Ratatouille (and isn't it great that the world will now know how to pronounce rat-a-too-tee?) may 'sound' fancy but it's just a few vegetables.


SO WHAT IS KITCHEN PARADE, EXACTLY? Kitchen Parade is the food column that my Mom started writing for our family newspaper when I was a baby. Today it's published in my hometown newspapers in suburban St. Louis and features 'fresh seasonal recipes for every-day healthful eating and occasional indulgences'.

Where A Veggie Venture is 'pure food blog', full of experimentation and exploration, Kitchen Parade features recipes a modern cook can count on. All are thoroughly tested by a home cook in a home kitchen and many are family and reader favorites. All recipes feature easy-to-find ingredients, clear instructions and because I believe so strongly in informed food choices, nutrition analysis and Weight Watchers points. Want to know more? Explore Kitchen Parade, including Kitchen Parade's Recipe Box!

WHY CAN'T I COMMENT ON THIS PAGE? Because I hope that you'll click through to the actual column and comment there!


How to eat more vegetables? A Veggie Venture is the home of Veggie Evangelist Alanna Kellogg and the best source of free vegetable recipes with 700+ quick and easy favorite vegetable recipes, the Alphabet of Vegetables, Weight Watchers low-point recipes and microwave vegetable recipes.
reade more... Résuméabuiyad

More Comfort Food for the Summer

The calendar tells me that it’s Summer, but my goosebumps and two layers of clothes are telling me the opposite. This can only mean one thing: the unique British Summertime.
The occasional sunny days, when all the barbeque's are dragged out, dusted off and set alight, meat blackening on top of these pyres, are always generously seasoned with showers, wind, overcast-ness and even hail.
Try as I might to endure the constant flip-flopping of the weather, I have simply written this summer off as a bad job and am looking forward to Autumn instead, when we at least stand some chance of warm weather.
This has reflected itself vividly in my cooking too. Cosy soups and comforting puds have been on the menu in the Erickson household these past few weeks.
I don’t want to completely give into eating steamed puddings just yet though, or cooking full roast dinners so I am trying to find a decent balance. Chowder seems to fulfil that need for something to give me a warm, culinary hug without shouting "Winter!" too loudly at me.
Despite its relatively local etymology (Chowder is a derivation of the French word Chaudiere, which roughly means a “hot pot”, although it could also refer to the word “jowter”, old English for Fishermonger), us closeted Brits don’t really cook Chowder, preferring vegetable, tomato or the Little Black Dress of the soup world, Chicken. However, since meeting my husband, I have discovered the joy of Chowder, just as the New Englanders did, so many years ago, when Breton fishermen would serve up huge, bubbling cauldrons of fish soup, freshly made with the catch of the day. To this day, Chowder is always affiliated with New England despite there being many deviations from the original French recipes, which would have originally resembled a Bouillabaise.
Indeed, such is the widespread popularity of the Chowder that it is noted in Moby Dick and makes an appearance in an episode of the Simpsons. Expensive but inferior tinned versions are available on every supermarket shelf.
The most famous of all Chowders though, is the Clam Chowder, a typical New England version, using their local shellfish catches and almost impossible to replicate if you live in the UK, far away from where Clams tend to inhabit. Fortunately, tinned Clams offer an ethereal taste of the Northeast and can be quite a convincing substitute.
But, for those unfortunate few who don’t like shellfish, you could just use plain old fish, prawns, cod, salmon, haddock, whatever firm fish is local to you. Or, forget the fish altogether and make a vegetarian version using potato and corn. The familiar creamy chowder texture is still vivid and the corn adds a wonderful sweetness to the soup that is offset by green peppers and onions. Some versions even add tomatoes, which is more redolent of the original fish stew served up by those French fisherman all those years ago.
It is dead simple to make; onions, garlic, celery, green pepper, diced potato simmered in olive oil, bacon fat or butter until tender. Some stock, milk, Cannellini Beans and canned Sweetcorn (I used creamed sweetcorn because that was all I had and it was just fine, although you may need to add a little more salt than usual) are then added, plus Dried Thyme and whole Peppercorns for a little bit of heat and the soup is virtually ready. At this point you could add your clams, or fish but it is completely substantial without either. A quick simmer, a readjustment of seasoning and the soup is ready to be served, steaming hot, into deep soup bowls, with crusty, buttered bread.
POTATO AND SWEETCORN CHOWDER serves 4-6
Ingredients:
2 Tablespoons Olive Oil
1 Tablespoon Butter or Bacon Fat (you can fry off a rasher or two
1 Onion, peeled and finely chopped
1 Clove Garlic, peeled and finely chopped
2 Sticks Celery, de-stringed and finely chopped
1 Small Green Pepper, finely chopped
1 Baking Potato, peeled and cut into ½” dice.
1 400g Can Tinned Sweetcorn or Creamed Sweetcorn
1 Tin Cannellini Beans (or tinned bean of your choice, you want a pale, creamy bean though)
Pinch of Dried Thyme or Sprig of Fresh
Seasoning
¾ Pint Stock or Water (I used water and the flavour was not impacted in anyway)
½ Pint Milk
METHOD:
Heat the oil and butter in a heavy bottomed saucepan and sauté the onions, garlic, celery, pepper and potato for about 4 or 5 minutes, or until the vegetables start to look translucent and soft.
Turn the heat down to low, cover and leave to gently sweat down for 5 minutes, stirring occasionally to ensure they don’t stick.
Pour over the stock or water, bring to the boil, turn down to a gently simmer, cover and cook for another 10 minutes or until the potato is cooked.
Add the beans, sweetcorn and milk, including all of their tin liquids, the Thyme and a little seasoning. Bring to the boil once more, turn down and simmer for another couple of minutes, just to allow the flavours to amalgamate.
Taste for seasoning and adjust as necessary.
Add a swirl of cream if necessary and a sprinkling of grated Gruyere or Cheddar to finish.
Serve with thickly buttered crusty bread.
Enjoy!
reade more... Résuméabuiyad

Cowboy Coleslaw ♥

To brighten a plate and a palateSo how pretty is this?!! It's just grated carrot, red cabbage and green onion in an otherwise simple slaw ...

The recipe comes from my cousin Laura who's mother of four, so while I haven't asked, you just know it's kid-friendly! I do know my fifteen-year old nephew had seconds! (All this to explain the recipe name 'Cowboy Coleslaw', which will appeal to kids, versus what I first intended to call it, Colorful Carrot & Cabbage Slaw, which I figure appeals more to the Moms of the world ... I tell you what, call it what you like, you know your audience.)

NEXT TIME I'll use white balsamic vinegar so the carrot doesn't stain.

NUTRITION NOTES I found the sunflower seeds optional -- and without them, the slaw drops from from one to zero Weight Watchers points! For the record, in part this is because the portion size is measured on the basis of a half cup of slaw, where recipes on A Veggie Venture nearly always assume a pound of vegetables divided four ways. THAT said, a half cup was very satisfying, full of crunch and flavor. This is no sissy coleslaw!


WEEKEND HERB BLOGGING This is my official entry to Weekend Herb Blogging that this week is being hosted by Food Blogga. The lovely Susan is a Rhode Islander (hence, blogga!) transplanted in southern California and a lovely story-teller with a knack for simple fresh food. In January, Susan, her husband and I shared a fast-talking late supper, one of those where you hardly notice the food (I know! and we call ourselves foodies!) because you're so enjoying the company.


FROM THE ARCHIVES The Recipe Box has lots of carrot recipes and cabbage recipes.

A YEAR AGO THIS WEEK Carrot & Sesame Salad ... "I'm a complete sucker for simple vegetable salads made with everyday ingredients 95% likely to be already on hand."

TWO YEARS AGO A classic: tomato with fresh mozzarella, balsamic vinegar and basil

COWBOY COLESLAW

Hands-on time: 15 minutes
Time to table: 15 minutes
Makes 3 cups

2 cups grated carrot (from 3 large carrots, I used a mandoline to grate because I like the perfect little slices but a hand-held grated worked fine too)
1 cup thin-sliced red cabbage (or radicchio)
1/4 cup chopped green onion (don't skip this)
2 tablespoons sunflower seeds (these added crunch but also calories, I don't think they're necessary)

DRESSING
2 tablespoons water
2 tablespoons balsamic vinegar (preferably white)
1 tablespoon olive oil
1 teaspoon Dijon mustard
1 teaspoon sugar
1/4 teaspoon kosher salt
1/4 teaspoon freshly ground pepper

Gently combine the vegetables (hold off on the sunflower seeds if making in advance). Whisk together the dressing ingredients and toss with vegetables. Top with sesame seeds and serve. Can be made a few hours in advance.


HOW MANY CALORIES, CARBS & WEIGHT WATCHERS POINTS IN CARROTS
Nutrition Information Per 1/4 pound of raw carrot: 46 Cal (5% from Fat, 8% from Protein, 87% from Carb); 1 g Protein; 0 g Tot Fat; 0 g Sat Fat; 0 g Mono Fat; 11 g Carb; 3 g Fiber; 5 g Sugar; 37 mg Calcium; 0 mg Iron; 78 mg Sodium; 0 mg Cholesterol; Weight Watchers 0 points

HOW MANY CALORIES, CARBS & WEIGHT WATCHERS POINTS IN RED CABBAGE
Nutrition Information Per 1/4 pound of raw red cabbage: 35 Cal (4% from Fat, 16% from Protein, 80% from Carb); 2 g Protein; 0 g Tot Fat; 0 g Sat Fat; 0 g Mono Fat; 8 g Carb; 2 g Fiber; 4 g Sugar; 51 mg Calcium; 1 mg Iron; 31 mg Sodium; 0 mg Cholesterol; Weight Watchers 0 points


PRINT JUST A RECIPE! Now you can print a recipe without wasting ink and paper on the header and sidebar. Here's how.

NEVER MISS A RECIPE! For 'home delivery' of new recipes from A Veggie Venture, sign up here. Once you do, new recipes will be delivered, automatically, straight to your e-mail In Box.

TAGS


A Veggie Venture is home of the Veggie Evangelist Alanna Kellogg and vegetable inspiration from Asparagus to Zucchini. © Copyright 2007
reade more... Résuméabuiyad

More Simple Food

There exists a special alchemy between Pork and Cabbage. Served apart, they are delicious, but when cooked together, the co-joining of the strong, definite flavours produces something truly sublime.
Europeans have long known the brilliant simplicity of using as few ingredients as possible in their cuisine. Not only does this spring out of frugality but from the sheer knowledge of the flavours.
Whilst some of us are lucky enough to be seemingly born with that knowledge of ingredients, it can also be learned through time and tasting.
This gathered experience warns us that certain foods are not good together. For example, cheese is rarely served with fish, beef isn’t generally served in a white wine sauce and ketchup isn’t poured over a roast dinner. However, there are always exceptions to every rule and it is wonderful to find an obscure taste sensation in the most unlikely place, the most recent of which might be salted caramels.
Even people with the most jaded taste-buds will know that some foods just belong together: cheese and tomato, chicken and tarragon, cabbage and sausage.
I know, the coupling of sausage and cabbage could sound like a nightmare school dinner. Washed out flabby cabbage with gristly, synthetic pink sausages that are more water and sawdust than anything resembling pork are the things bad childhood meals are made of. But imagine this! Crisp Savoy cabbage, dark green and rich in iron, combined with artisinal sausages that are now so easy to find in any supermarket, accessorised with a blanket – no, pashmina – of thick cheese sauce, then browned in a hot oven until golden and bubbly. Served with nothing more than some crusty bread or Pommes Anna, this is an easy, all-in-one dish guaranteed to satisfy that intrinsic need for comfort food. Thank heavens for the always reliable Jane Grigson with her wealth of knowledge and non-fussy dishes. This recipe comes from her indispensable Vegetable Book.

SAUSAGE AND CABBAGE IN THE DUTCH STYLE serves 4 with a side dish
Taken from Jane Grigson’s Vegetable Book
Ingredients:
1 Large Cabbage, Savoy is best for flavour but you can use almost any kind, shredded and par-boiled.
8 Excellent Quality Sausages
A little Olive Oil (Jan Grigson recommends using lard so you could use this instead)
3 Heaped Tablespoons Plain Flour
2 Tablespoons of the oil from the cooked Sausages
¾ Pint Milk
2 Tablespoons Grated Cheddar or Parmesan, grated – a strong flavoured but good melting cheese is needed
1 Tablespoon Gruyere, cut into small dice or grated
Seasoning and fresh Nutmeg
METHOD:
Preheat the oven to 180c. Drizzle a tablespoon or two of the olive oil into the bottom of a roasting tin and place in the oven to heat up.
When the oven and oil are hot, place the sausages into the hot fat. They should sizzle immediately. Return to the oven and roast for about half an hour, turning once or twice to ensure a fairly even brown.
Meanwhile, parboil the cabbage. Leave to drain in a colander.
Once the sausages are richly coloured, remove from the oven and drain off 3 tablespoons of the oil (the sausages will have exuded some) into a large saucepan.
Stir the drained cabbage into the sausages and return to the oven whilst you prepare the sauce.
Add the flour to the sausage oil, turn the heat up to medium high and cook briskly to make a roux.
Pour over the milk and whisk until thickened. The sauce needs to be thick as the cabbage will still give off some water, thus diluting the sauce further in the oven. Season with salt, pepper and a rasp of nutmeg.
Remove from the heat and stir in the cheeses, whisking well to ensure that they are melted thoroughly into the sauce. Taste again for seasoning.
Remove the cabbage and sausage from the oven (turning the oven up to 220c), ladle over the sauce and mix well. Sprinkle over some grated cheddar or Parmesan if desired and return to the oven for another 10 minutes or so. You will hear the bubbling, indicating when it’s ready to serve.
The cabbage will have turned an unctuous sticky brown on the underside, seasoned generously by the sausages and the sauce will be coating everything snugly.
Serve with some sliced potatoes (Pommes Anna) or perhaps a green, bitter salad to counter the richness. Thick crusty bread is an essential.
Enjoy!
reade more... Résuméabuiyad

Zucchini Carpaccio ♥

Thin-sliced zucchini, dressed with (very very) good oil & vinegar"This is lunch?" asked an unimpressed fifteen-year old when encountering nothing but small plates of thin-sliced zucchini on the kitchen table. But with a go-along-to-get-along attitude, my nephew Alex attacked the zucchini and quickly allowed, "This is good, really really good."

For me, it was a lesson in the power of simplicity, how superior ingredients create the possibility of 'so much more from a whole lot less'. The lesson comes courtesy of the craftsmanship and generosity of the folks at O Olive Oil. These thin slices of baby zucchini are dressed with nothing more than (really really) good olive oil, (really really) good vinegar and a sprinkling of Maldon salt.

Even the 15-year old was impressed by the arrival of the O's beautiful bottles. We sniffed first, then read the labels. It was fun: orange? yes! lemon? yes!!

Then over the course of ten days, he learned how to make salad dressing, experimenting with sluicing the oil and vinegar with a fork, some times adding a dollop of mustard, other times fresh herbs from the side garden, matching orange to beets and lemon (and honey, his favorite) to zucchini.

Each new combination was a sensual delight, brightening salad greens and coaxing new depths of flavor from vegetables raw and roasted.

"Yummmm," I'd think, quoting a favorite olive-oil maker.

"We could drink this," said the fifteen-year old after whisking together a clear sunny-colored vinaigrette of meyer lemon olive oil and a champagne vinegar. He was right, we could have.

For simplicity like this, quality counts. It's a lesson not to be forgotten.

And while I've never before purchased really good olive oil or good vinegar, it's a lesson that has me budgeting for the good stuff from now on. My mental gyrations go like this: I happily spend $20 a pound for really good meat that's devoured in a single meal. But what if I skip the meat to purchase a bottle of olive oil that will grace lovely salads for an entire month? That's a deal I can live with.

WHAT IS CARPACCIO? Pronounced [kahr-PAH-chee-oh], carpaccio is an Italian dish, thin slices of raw beef, usually served as an appetizer. By extension, a zucchini carpaccio is thin slices of, yup, zucchini.


FROM THE ARCHIVES How about beet carpaccio? Or check the Recipe Box for more zucchini recipes.

A YEAR AGO THIS WEEK Spring & Summer Sliced Salad ... from Orangette, "the perfect salad meal for a hot summer night and a lovely side salad with grilled pork and broiled fish"

ZUCCHINI CARPACCIO

Hands-on time: 15 minutes (for 2 salads)
Time to table: 15 minutes
Serves 2

2 baby zucchini (1 per person, about 1/8 pound each)
1 tablespoon good olive oil
1 teaspoon good vinegar
Good salt

[or of course, your own proportions, another time we tried 4:1 oil and vinegar with a little honey, very very good]

Fresh mint, optional (we tried this another time, gorgeous!)
Pea sprouts, optional (same ...)

Slice the zucchini as thin as you can (I used a Japanese mandoline). Whisk the oil and vinegar, drizzle over top. Sprinkle with salt. Enjoy, immensely, immediately.


HOW MANY CALORIES, CARBS & WEIGHT WATCHERS POINTS IN ZUCCHINI
Nutrition Information Per 1/4 pound of raw zucchini, the flesh and skin both: 18 Cal (8% from Fat, 24% from Protein, 67% from Carb); 1 g Protein; 0 g Tot Fat; 0 g Sat Fat; 0 g Mono Fat; 4 g Carb; 1 g Fiber; 2 g Sugar; 17 mg Calcium; 0 mg Iron; 11 mg Sodium; 0 mg Cholesterol; Weight Watchers 0 points


PRINT JUST A RECIPE! Now you can print a recipe without wasting ink and paper on the header and sidebar. Here's how.

NEVER MISS A RECIPE! For 'home delivery' of new recipes from A Veggie Venture, sign up here. Once you do, new recipes will be delivered, automatically, straight to your e-mail In Box.


TAGS

A Veggie Venture is home of the Veggie Evangelist Alanna Kellogg and vegetable inspiration from Asparagus to Zucchini. © Copyright 2007
reade more... Résuméabuiyad